
Fix Surrey Satellite Dish Leaks in One Day With Roofing Grade Flashing
Fix Surrey Satellite Dish Leaks in One Day With Roofing Grade Flashing

If water is coming in through a satellite-dish mount, stop the interior damage first: set a container under the drip, move anything valuable, and photograph the stain. Apply a safe temporary seal only to slow water entry, never as a fix. Then book a roofing-grade diagnosis, because the mount needs proper flashing built into your specific roof system, not another tube of caulking.
TL;DR:
- Proper flashing and secure fastening into rafters or blocking are essential to prevent satellite dish leaks, not just sealant application.
- Over time, roof penetrations can enlarge holes, and aging sealants or missing flashing are common causes of leaks, especially in Surrey’s windy and rainy climate.
- A thorough diagnosis involves inspecting attic stains, running water tests, and taking detailed photos before any repair to ensure accuracy and accountability.
- Non-penetrating mounts are recommended to eliminate the risk of future leaks, with regular resealing of fasteners and replacement of gasket boots as preventive measures.
- A durable fix requires detailed scope, materials, and warranty documentation from the roofer, with emphasis on installing flashed mounts into the roof system rather than relying solely on caulking.
Table of Contents
- What confirms a satellite dish is causing your Surrey roof leak?
- What should you do before the roofer arrives?
- How is a dish-mount leak repaired on different roof types?
- How do you stop a satellite dish leak from coming back?
- What should you ask a Surrey roofer before hiring them for this repair?
- What Surrey roofs teach us about dish-mount leaks
- Get your dish-mount leak diagnosed properly
- Sources
- FAQ
What confirms a satellite dish is causing your Surrey roof leak?
A stain that radiates outward from directly below the mount, rather than from a bathroom vent or a valley, is the first clue. Attic insulation that’s damp only along the line where the mounting legs sit tells you the water is following the fasteners down through the deck, not migrating from somewhere else on the roof.
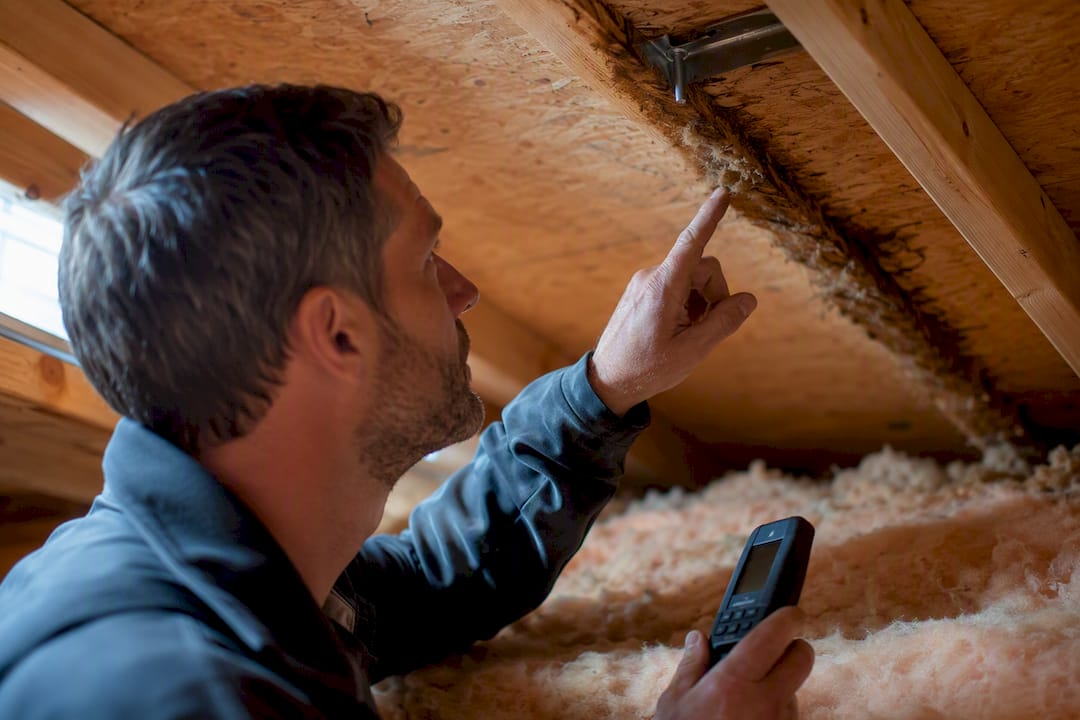
Surrey’s rain pattern makes this diagnosis trickier than it sounds. Wind-driven rain off the Fraser Valley can push water sideways under a lifted shingle tab near a dish leg, so the entry point on the roof surface and the stain on your ceiling are rarely stacked directly on top of each other. A proper trace means climbing into the attic with a flashlight, looking for daylight around the mount penetration, and running a garden hose over the suspected area in stages while someone watches from below.
The usual culprits behind a Surrey satellite dish leak include:
- Lag-screw enlargement : the screw hole widens over years of wind vibration, creating a gap sealant can’t bridge.
- Failed or missing flashing : many installers skip flashing entirely and rely on caulking around the base.
- Aged sealant : exterior-grade sealants in the Lower Mainland typically lose their seal well before most homeowners expect.
- Cable entries under shingles : coax cable is often tucked under a shingle tab with no boot or flashing at all.
Pro Tip: Take wide-angle and close-up photos of the mount, the attic underside, and any staining before you touch anything. Strata councils and insurers both want a timestamped record, and a contractor can diagnose faster from good photos than from a verbal description.
Every roof penetration, whether it’s a vent pipe or a dish mount, is a potential leak path, and proper flashing plus mechanical integration is what actually stops water, not the sealant sitting on top of it.
What should you do before the roofer arrives?
Do these steps in order, and don’t skip the safety checks to save time:
- Contain the water inside. Place a bucket or basin under the drip, and pull insulation away from the wet spot if you can reach it safely from a hatch, so it can dry instead of holding moisture against your ceiling drywall.
- Ventilate the area. Open an attic vent or run a small fan nearby to help damp insulation and framing dry out before mould becomes a second problem.
- Apply a temporary exterior patch only if it’s safe to reach. A tarpaulin weighted at the edges, or a butyl patch pressed over the mount base, can buy you a few days. Mark it clearly so nobody mistakes it for a finished repair.
- Call a roofer, not just an electronics installer. The mount is now a roofing problem.
Never walk a steep asphalt or metal roof in Surrey’s wet season. Slick moss patches and morning dew make even a low-pitch roof dangerous, and a fall is a far worse outcome than a delayed repair. If the leak is heavy, tracking toward electrical wiring, or the ceiling is sagging, that’s an emergency call, not a wait-and-see situation. Temporary caulk-only patches will fail again, and emergency measures should always be followed by a roofing-grade repair that rebuilds the flashing properly.
How is a dish-mount leak repaired on different roof types?
The right repair depends entirely on what’s under the mount. A Surrey character home with cedar-look asphalt shingles needs a different detail than a strata townhouse with a torch-on flat roof, and a contractor who treats every mount the same way is the one who’ll be back in two years.
- Asphalt shingles : the mount comes off, the roofer inspects the deck for rot, replaces the underlayment section, and installs a flashed mount base tied into the shingle courses above and below it. Shingles get re-integrated around the new flashing so water sheds over it, not into it.
- Standing-seam metal : seam clamp mounts that grip the panel without piercing it are the preferred approach. When a penetration is unavoidable, expect custom flashing with gasketed fasteners, and confirm the fasteners land in seam-supporting members rather than through bare panel.
- Flat roofs (EPDM or torch-on) : membrane-compatible flashed plates or fully welded details are standard here. Ballasted, non-penetrating sleds are worth asking about for flat commercial or strata roofs where signal alignment allows it.
- Synthetic and composite tiles (including Brava, Enviroshake, and Euroshield installs common across Metro Vancouver): stepped flashing under the tile courses, replacement of any cracked tiles disturbed during the repair, and structural blocking under the mount base. These tiles crack if handled roughly in cold weather, so timing and care matter.
Whatever the roof type, the fasteners need to land in rafters or blocking, never just into sheathing, and component replacement beats a sealant-only patch every time a flashing has already failed once. If the deck underneath has softened from prolonged moisture, that section of decking gets replaced before any new flashing goes down.
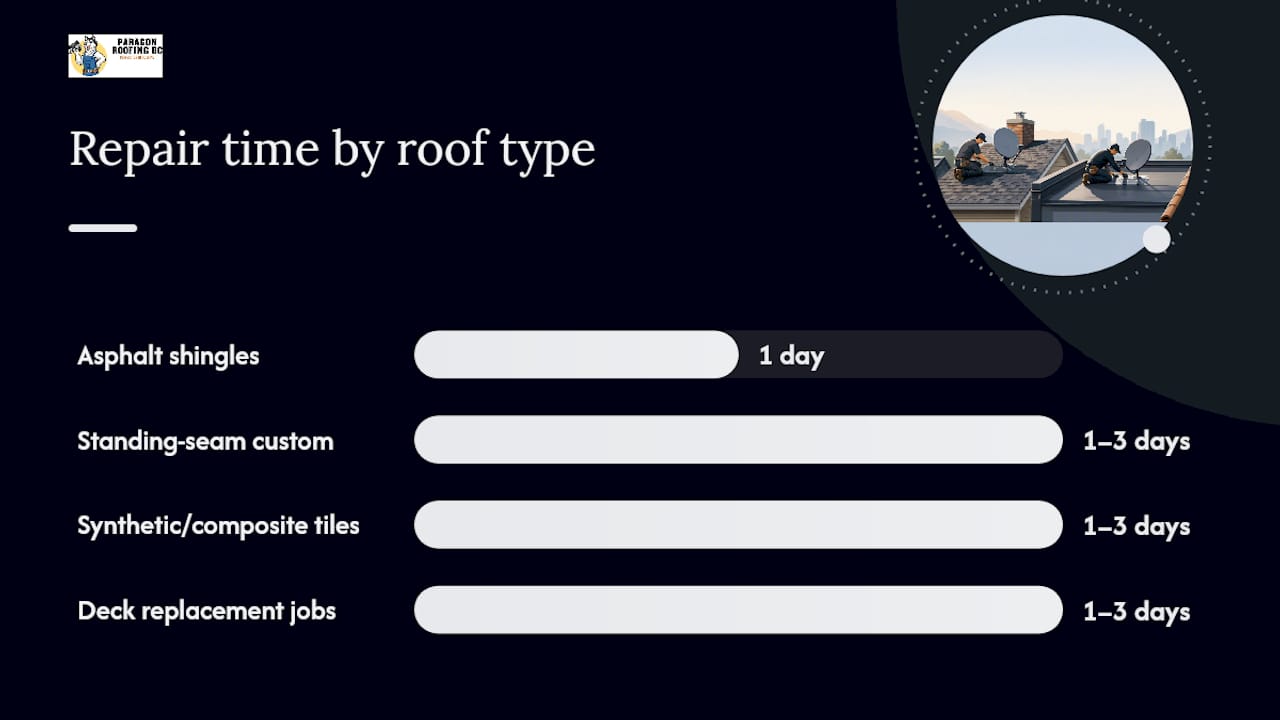
Most diagnostic visits happen same-day or within 48 hours of your call. A straightforward flashing repair on an asphalt roof usually takes one day. Anything involving deck replacement, standing-seam custom flashing, or synthetic tile matching typically runs one to three days.
How do you stop a satellite dish leak from coming back?
The single best prevention step is avoiding a new hole altogether. Non-penetrating mounts, ridge clamps, chimney straps, and ballasted sleds deliver usable signal in most Surrey installs while eliminating the roof-deck risk that a lag-bolted mount carries for the life of your roof.
- Ask your installer for a non-penetrating mount first, and only accept a through-roof fastener if signal strength genuinely requires it.
- If a penetration already exists, reseal fasteners annually with a polyurethane sealant rated for exterior roofing use, not a generic hardware-store caulk.
- Replace rubber or gasket boots on any cable or pipe penetration every five to eight years, since UV exposure breaks them down faster than most owners realize.
- Inspect flashing and fastener torque after spring thaw and again after any major windstorm, when wind-driven rain has the best chance of finding a weak point.
Pro Tip: If you sit on a strata council, add a simple rule to your bylaws: no rooftop accessory, dish included, gets installed without photos of the finished flashing detail and a materials list on file. Requiring installation photos before approving any rooftop accessory is the cheapest insurance a strata corporation can buy against a future warranty dispute.
What should you ask a Surrey roofer before hiring them for this repair?
Treat active leaks, saturated attic insulation, or visible deck rot as urgent. Those conditions get worse every rain event, and Surrey sees plenty of them between October and March.
Before you sign off on the work, ask for:
- Photos of the fastener holes and flashing detail , both before and after the repair.
- A written scope of work naming the flashing material and how it integrates with your roof covering.
- A materials list , so strata records show exactly what went into the repair.
- A warranty in writing , covering both labour and the flashing components.
- Confirmation that fasteners land in rafters or blocking , not just sheathing.
A roofer who can’t answer these plainly, or who wants to reseal the old mount with more caulking, isn’t giving you a durable fix. Requiring installer photos and a written flashing detail protects you if a dispute comes up later with an insurer or a strata owner. If your building already has an inspection scheduled, ask whether the dish mount can be checked in the same visit.
What Surrey roofs teach us about dish-mount leaks
Most dish-mount leaks I see in Surrey trace back to the same shortcut: an installer treated the roof surface like drywall, drove in a few lag screws, and caulked around the base. That works for about a season, sometimes two, and then the shingles or membrane around it start failing from the inside out.
The fix that actually holds is the one that respects the roof system underneath the mount. Flashing, structural fastening into rafters or blocking, and a repair scope written down before work starts. Anything less is a return visit waiting to happen.
— Harman
Get your dish-mount leak diagnosed properly
Paragon Roofing BC is the direct call for Surrey homeowners and strata councils dealing with a leak that started at a satellite-dish mount, rather than a generic handyman patch that lasts one season. We diagnose the mount as a roofing penetration first, tracing the water path through the attic, then scope a repair matched to your actual roof system, whether that’s asphalt shingle, standing-seam metal, EPDM, torch-on, or synthetic tile.

On-site, you’ll receive photographic documentation of the fastener holes and finished flashing detail, a written repair scope, and a materials list for your records. For homeowners across Surrey, our residential roofing services cover everything from the initial inspection to the finished flashing rebuild. Strata and commercial property managers can also review our Surrey commercial roofing work for multi-unit and low-slope buildings. Ready to get the leak stopped for good? Reach out through our roofing contractor near me page and we’ll book a diagnostic visit.
Sources
FAQ
Can a satellite dish really cause a roof leak?
Yes. Lag screws driven through shingles or membrane without proper flashing create a direct path for water, and aged sealant around the mount base fails well before most homeowners notice.
Is caulking around the dish mount enough to fix the leak?
No. Caulking is a temporary measure at best; a durable repair needs flashing that integrates with your roof covering and fasteners anchored into rafters or blocking.
How fast can Paragon Roofing BC diagnose a Surrey dish leak?
Most diagnostic visits happen quickly after your call, with straightforward asphalt-shingle repairs typically finished in one day or less.
Should I remove the satellite dish myself before the roofer arrives?
Only if you can do it safely from the ground or a stable ladder; otherwise leave the mount in place and focus on interior containment until a professional inspects it.
What documentation should I keep for my strata council or insurer?
Photos of the leak, the attic staining, and the finished repair, plus the written scope of work, materials list, and warranty terms your roofer provides.
Recommended
Our Roofing Blog


Have more questions about roofing?
Check out our FAQs or give us a call today to speak to an expert roofer in Vancouver Lower Mainland, BC. We're here to help our neighbours make educated decisions about their roof. For our team, we value helping clients save money while making their roofs last.