
How to spot a failed pipe boot flashing on your Burnaby roof
How to spot a failed pipe boot flashing on your Burnaby roof

A cracked or pulled-down rubber collar on a vent pipe boot is the single most reliable sign of a failing pipe boot flashing — photograph it immediately and schedule a professional inspection before the next rain. Vent boots account for roughly 30% of residential roof leaks, and the damage they cause to attic framing and insulation often goes unnoticed for months. If you can see radial cracks in the rubber collar from the ground, or if your attic shows any staining near a vent penetration, treat it as urgent.
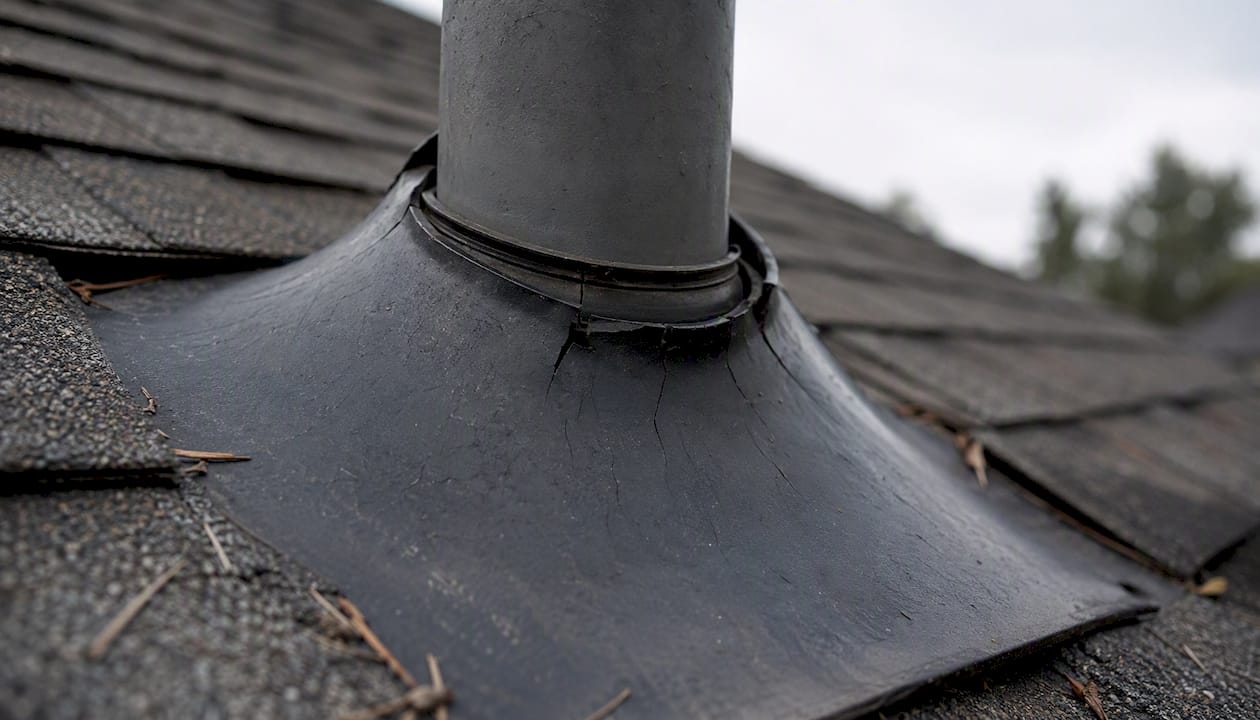
Pro Tip: Take a wide-angle photo from the driveway and a close-up from the gutter line before calling anyone. Those two shots tell a roofer almost everything they need to triage the job over the phone.
Key takeaways
A cracked or pulled-down rubber collar on a vent boot is the most reliable early sign of failure, and catching it before the deck gets wet is the difference between a $200 repair and a $2,000 one.
| Point | Details |
|---|---|
| Photograph first | Take a close-up of the collar and a wide shot from the driveway before climbing or calling anyone. |
| Rubber boots fail at 8–12 years | Standard EPDM collars typically fail well before the surrounding shingles; inspect any boot over 10 years old. |
| Caulk is not a repair | Caulk-only patches last 6–18 months and can hide deck damage; insist on a proper flange inspection. |
| Upgrade the material | Silicone or thermoplastic boots cost $30–$60 in materials but last decades in Burnaby’s coastal climate. |
| Paragonroofingbc for Burnaby | Paragonroofingbc inspects the full flange and deck, provides a written report, and groups repairs to reduce cost. |
Table of Contents
- What identifying failed pipe boot flashing looks like from the ground
- What actually breaks: causes of pipe boot failure in the Lower Mainland
- How to safely inspect your own roof before calling a roofer
- Temporary fixes versus permanent repairs: options and BC cost ranges
- When to hire a contractor: red flags and questions to ask a Burnaby roofer
- How Paragonroofingbc inspects and repairs pipe boots for Burnaby’s climate
- A practical perspective for Burnaby homeowners and strata managers
- Paragonroofingbc’s Burnaby pipe boot inspection and repair service
- Sources
- FAQ
What identifying failed pipe boot flashing looks like from the ground
You do not need to climb onto the roof to flag a problem. Most of the warning signs for damaged roof flashing are visible from the driveway, the gutter line, or the attic hatch — if you know what to look for.
From the ground or gutter line:
- Radial cracks radiating outward from the pipe through the rubber collar (looks like a dried-out gasket)
- The collar has slid or pulled down the pipe, leaving a visible gap between the rubber and the pipe surface
- Discolouration or dark staining on shingles directly downhill of the vent pipe
- Visible rust streaks running down the pipe from the collar area
- Roofing caulk or sealant piled around the base of the collar — a classic sign of a previous patch-up that did not hold
On the roof surface (only if safe access is possible):
- Lifted or buckled flange edges where the base plate sits under the shingles
- Exposed nail heads on the flange, or nails that have backed out
- Shingles around the penetration that feel soft or spongy underfoot
In the attic:
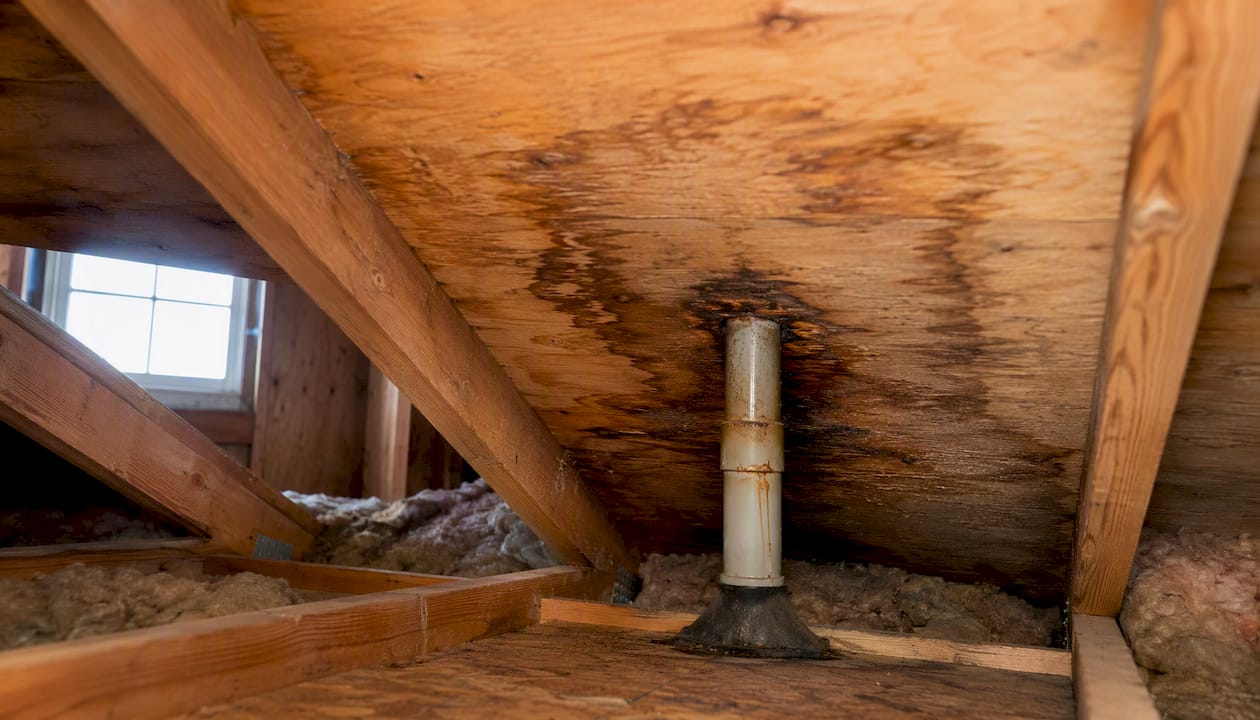
- Ceiling stains 2–6 feet downhill of the vent, damp insulation around the penetration, rust streaks on the pipe, or daylight visible around the pipe where it exits the deck — any one of these confirms active water entry
Pro Tip: Photograph the collar from two angles: one close-up showing the crack or gap, and one wide shot showing the pipe’s position relative to the ridge and the nearest shingles. Timestamp both. That documentation speeds up both the contractor quote and any insurance conversation.
What actually breaks: causes of pipe boot failure in the Lower Mainland
Understanding why boots fail helps you judge how serious a crack really is and whether a quick fix will hold or just delay the inevitable.
UV and material ageing
Standard EPDM rubber collars are the most common boot material on Burnaby roofs installed over the past two decades. They typically fail at 8–12 years under UV exposure and thermal cycling, well before the 25–30 year shingles around them reach end of life. The rubber dries, hardens, and develops radial cracks that open up every time the pipe expands and contracts with temperature changes. In climates with strong UV, freeze-thaw cycles, and coastal moisture — exactly what Burnaby and the Lower Mainland deliver — EPDM degrades faster than in moderate inland climates. A boot installed during a 2012 or 2013 reroof is statistically overdue right now.
Installation and fastening problems
Exposed nail heads on the flange are a common installation shortcut. When nails are driven through the top of the flange rather than hidden under the uphill shingles, they become direct water entry points as the sealant around them ages. Surface-caulked flashings — where the installer relied on roofing cement rather than proper shingle interleaving — are the other frequent culprit. Excessive caulk around a vent is almost always a sign of an improper repair rather than a proper installation; it traps moisture and makes the next proper repair harder.
Thermal movement and freeze-thaw
Burnaby sits in a coastal climate with mild but persistent freeze-thaw cycling through November to March. The pipe itself expands and contracts with temperature, and the collar has to flex with it. Once EPDM hardens with age, it can no longer accommodate that movement — the collar cracks or pulls away from the pipe. Wind-driven rain, which arrives from the southwest in most Lower Mainland storms, pushes water uphill under a lifted flange in ways that a dry-weather inspection would never reveal.
When the flange is still sound versus when it is not
| Condition | What it means | Recommended action |
|---|---|---|
| Collar cracked, flange flat and intact | Collar has failed; base is still good | Retrofit slip-on collar or new boot over existing flange |
| Collar pulled down, flange edges lifting | Both collar and flange compromised | Full boot replacement |
| Flange rusted, deck soft or stained | Flange and deck damaged | Full replacement including deck repair |
| Caulk-only previous repair visible | Hidden damage likely underneath | Remove caulk, inspect flange and deck before deciding |
How to safely inspect your own roof before calling a roofer
A careful pre-inspection gives you better information and a faster contractor quote. Follow these steps in order.
- Check the weather forecast. Never inspect a wet, icy, or frost-covered roof. Wait for a dry day with no wind. Morning dew counts as wet.
- Gather your PPE. Non-slip footwear, work gloves, and safety glasses at minimum. If the pitch is steeper than 6:12, stay on the ladder.
- Set up the ladder safely. Extend it at least three rungs above the eave. Have a second person foot the ladder. Never lean sideways off a ladder to reach a vent.
- Photograph from the ladder before touching anything. Get a close-up of the collar and a wide shot showing the pipe relative to the ridge.
- Gently press the collar. If it is brittle, cracks further, or moves independently of the pipe, the rubber has failed. Do not force it.
- Check the flange edges. Slide a gloved finger under the downhill shingle edge nearest the boot. If the flange lifts easily or feels soft underneath, the flange-to-deck seal has broken.
- Look for daylight around the pipe. From the roof surface, look down the gap between the collar and the pipe. Any visible light means the seal is gone.
- Go into the attic. Bring a torch. Look at the underside of the deck directly above and downhill of the vent. Staining, soft wood, or wet insulation confirms active or recent water entry. Connecting the exterior condition, the attic evidence, and the timing of any interior stains gives you a reliable diagnosis.
- Document everything with timestamps. Photos with timestamps are useful for insurance claims and for giving a contractor a clear picture before they arrive.
- Note neighbouring penetrations. Check every other vent boot visible from the same position. Boots installed at the same time age together, and a cracked collar on one usually means the others are close behind.
Pro Tip: If you suspect a leak but cannot confirm the source, have a helper spray water on the roof in zones while you watch from the attic with a torch. Start below the suspected boot and work uphill. The moment water appears on the deck underside, you have found the entry point.
Temporary fixes versus permanent repairs: options and BC cost ranges
Not every boot failure needs an emergency call-out. Understanding your options helps you make a smart decision, especially for strata managers juggling multiple repairs.
Short-term measures
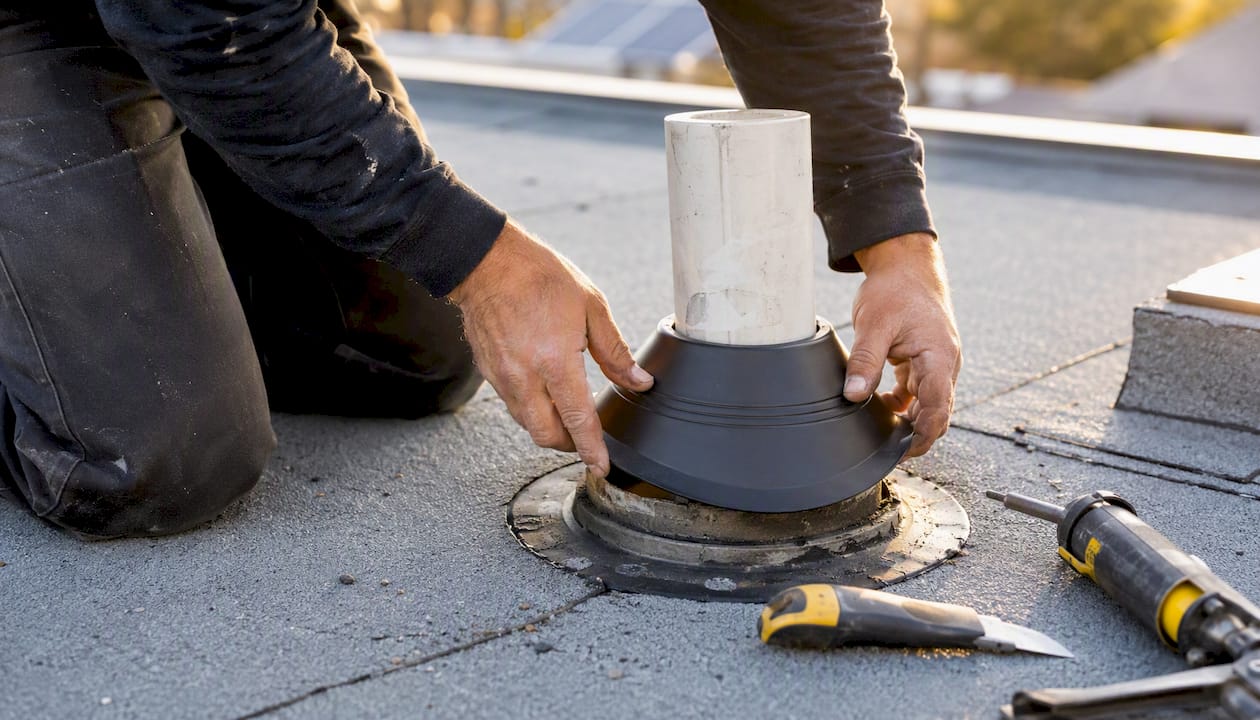
A slip-on retrofit collar (such as a Perma-Boot style sleeve) slides over the existing pipe and seals against the old boot without removing the base flange. This works well when the base flange is still flat and intact; it is a legitimate repair, not just a patch. Expect 5–10 years of service from a quality retrofit collar. Roofing caulk alone is not a repair. Caulk-only patches typically fail within 6–18 months and can trap moisture against the flange, making the eventual proper repair more expensive.
Permanent replacement options
Full boot replacement involves lifting the surrounding shingles, removing the old flange, and installing a new boot properly integrated into the shingle course. Material choice matters here. Better-designed boots in silicone, thermoplastic, or fabricated lead cost more upfront but can provide decades of service compared with commodity rubber. For a Burnaby roof that sees coastal moisture and freeze-thaw every winter, that upgrade pays for itself quickly.
Professional replacement in BC runs roughly $150–$450 per boot, depending on roof pitch, number of boots, and whether deck or underlayment repair is needed. A steep roof or a boot surrounded by damaged decking pushes the cost toward the top of that range. Replacing multiple boots during a single visit reduces the per-boot labour cost significantly.
When to hire a contractor: red flags and questions to ask a Burnaby roofer
Some situations call for a professional right away, regardless of how minor the visible damage looks.
Call a roofer immediately if you see any of these:
- Daylight visible around the pipe from inside the attic
- Soft or spongy roof deck around the penetration
- Attic insulation that is wet, compressed, or stained directly below a vent
- Soffit or wall staining that appeared after a rain event
- Multiple boots showing cracking on a roof that is 10 or more years old
- Any previous caulk-only repair that has already failed once
Practical thresholds for booking an inspection:
- Your roof is 10+ years old and you have never had the boots inspected
- You notice a ceiling stain after every significant rain, even a small one
- A strata or property manager’s maintenance log shows recurring leak calls near vent locations
Questions to ask before signing a repair contract:
- Will you lift the shingles around the boot to inspect the flange and deck, or just replace the collar?
- How do you integrate the new flange into the shingle course?
- Do you check the underlayment condition under the flange?
- What warranty do you offer on the boot and the labour?
- How long will the repair take, and will the roof be left watertight at the end of the day?
Red flags in a contractor’s approach:
- Proposing caulk or sealant as the primary repair method
- Refusing to lift shingles to inspect the deck
- No written scope of work or warranty
- Quoting only the collar without mentioning the flange condition
Pro Tip: Ask specifically whether the contractor will check the underlayment under the flange. A boot that has been leaking for even one season can saturate the underlayment, and replacing the boot over wet underlayment just restarts the clock on the same problem.
How Paragonroofingbc inspects and repairs pipe boots for Burnaby’s climate
Paragonroofingbc follows a consistent on-roof protocol for every vent flashing job in Burnaby and across the Lower Mainland, because the climate here demands more than a collar swap and a tube of caulk.
On-roof inspection steps:
- Document the existing condition with photos before touching anything — collar condition, flange edges, shingle integration, and any visible staining on the deck surface
- Lift the surrounding shingles to expose the full flange and inspect the deck and underlayment underneath
- Measure the pipe diameter and height above the deck to select a compatible replacement boot
- Check neighbouring penetrations on the same roof plane — boots of the same vintage are inspected together
- Confirm the deck is dry and structurally sound before installing any new material
Why Burnaby’s climate shapes our material choices:
Wind-driven rain from the southwest is the dominant leak driver in the Lower Mainland. A boot that sits flush with the shingle surface will admit water under sustained lateral rain even when the collar is intact. Paragonroofingbc selects boots with a taller collar profile and, on roofs with a history of leaks, recommends silicone or thermoplastic options over standard EPDM. Upgraded materials and fabricated collars commonly extend service life to 25–30+ years, which matters on a Burnaby roof that faces coastal moisture every winter.
Documentation for strata and property managers:
Paragonroofingbc provides a written inspection report with annotated photos, a condition rating for each penetration, and a prioritised repair list. For strata corporations, that report supports maintenance planning and reserve fund decisions. Grouping multiple boot replacements into one visit is almost always more cost-effective than responding to individual leaks one at a time.
| Scenario | Paragonroofingbc recommendation |
|---|---|
| Collar cracked, flange intact, deck dry | Retrofit collar or full boot replacement with upgraded material |
| Collar and flange both compromised | Full boot replacement, shingles lifted and re-integrated |
| Deck or underlayment damaged | Full replacement including deck repair before new boot install |
| Multiple aging boots on same roof | Group replacement in one visit; upgrade to silicone or thermoplastic |
A practical perspective for Burnaby homeowners and strata managers
The best time to inspect pipe boots in Burnaby is September or early October, before the sustained rain season sets in. A dry late-summer day gives you good visibility, and any repairs can be completed before November’s wind-driven rain arrives. Waiting until you see a ceiling stain in January means scheduling emergency work in wet conditions, which costs more and takes longer.
If you are already planning other roof work — a shingle replacement, a chimney repair, a gutter overhaul — bundle the boot replacements into the same scope. The incremental labour cost of replacing four or five boots while a crew is already on the roof is a fraction of what four separate call-outs would cost. Boots installed at the same time age together, so replacing only the one that is visibly cracked while leaving its neighbours is a short-term saving that usually costs more within two or three years.
One thing I see consistently in the field: homeowners photograph the ceiling stain but not the attic. The attic photo is the one that actually tells the story. A stain on the deck underside with a rust streak running down the pipe is unambiguous evidence of the entry point, and it is the photo that moves an insurance conversation forward fastest. Get into the attic before you call anyone.
Paragonroofingbc’s Burnaby pipe boot inspection and repair service
Paragonroofingbc offers roof vent flashing inspections and repairs across Burnaby and the wider Lower Mainland, with a process built specifically for the coastal climate conditions that shorten standard rubber boot life. Where other contractors swap the collar and move on, Paragonroofingbc lifts the shingles, checks the deck and underlayment, and selects replacement materials rated for the moisture and freeze-thaw exposure your roof actually faces.

For strata councils and property managers, every inspection includes a written report with annotated photos and a prioritised repair list you can take directly to a board meeting or reserve fund review. For homeowners, the process is straightforward: call with your roof age, the number of visible vents, any photos you have taken, and details of recent storms. Paragonroofingbc will confirm coverage, explain the scope, and give you a clear timeline.
When a boot inspection reveals deck or underlayment damage, Paragonroofingbc can scope the full residential roof repair in the same visit, so you are not managing two separate contractors. Book your Burnaby inspection before the rain season starts.
Sources
- Roof vent pipe boot: failure point & replacement | TRB
- Roof pipe boot problems: leaks & fixes | Crestline
- Pipe boots, vent stacks and roof penetration flashing guide | NC Roofing Solution
- Roof vent flashing repair: signs of an improper roof repair | The Roof Whisperer
- Roof vent pipe boots in Minnesota: the #1 silent roof leak | Owl Roofing
FAQ
Are pipe flashing and pipe boot the same thing?
Yes, in residential roofing the terms are used interchangeably. A pipe boot (also called a vent boot or pipe flashing) is the two-part assembly consisting of a metal or plastic base flange and a rubber or silicone collar that seals around the vent pipe where it exits the roof.
What does a roof vent boot look like when it is failing?
A failing boot typically shows radial cracks in the rubber collar, a collar that has slid down the pipe leaving a visible gap, or a base flange with lifted edges. From the attic, you may see staining on the deck underside or wet insulation directly around the penetration.
How much does it cost to replace a roof vent boot in BC?
Professional replacement in BC runs roughly $150–$450 per boot, depending on roof pitch, material selected, and whether deck or underlayment repair is needed. DIY material costs are $15–$60 for a replacement boot or retrofit collar.
How quickly can a failed boot cause interior damage?
A boot that has lost its collar seal can allow water into the attic within a single rain event. Because the leak path often runs along the pipe or deck before dripping, visible ceiling stains can appear 2–6 feet away from the vent and may take one or more seasons to become obvious indoors.
When should I call Paragonroofingbc instead of patching it myself?
Call Paragonroofingbc when you see daylight around the pipe from the attic, when the deck feels soft near the penetration, when multiple boots on the same roof are cracking, or when a previous caulk repair has already failed. Paragonroofingbc lifts the shingles, inspects the deck and underlayment, and provides a written report — the right scope for anything beyond a straightforward collar swap on a sound flange.
Recommended
Our Roofing Blog


Have more questions about roofing?
Check out our FAQs or give us a call today to speak to an expert roofer in Vancouver Lower Mainland, BC. We're here to help our neighbours make educated decisions about their roof. For our team, we value helping clients save money while making their roofs last.
