
Inspection First Triage for West Vancouver Dormer Leaks
Inspection First Triage for West Vancouver Dormer Leaks

Most dormer leaks in West Vancouver start at the flashing, not the shingles. Step flashing gaps, corroded valleys, and missing kick-out flashing let wind-driven rain push past the roof surface, and salt air off Howe Sound speeds up the corrosion that causes it. If you’re seeing a stain near a dormer wall, contain the water, photograph the damage, protect anything underneath, and book an inspection before the next storm arrives at the same weak point again.
TL;DR:
- Most dormer leaks in West Vancouver originate at the flashing, especially failed step flashing, valley, or missing kick-out flashing, often caused by corrosion from salt air.
- Proper inspection involves lifting shingles around the dormer and testing sheathing moisture, as water often travels along framing before causing visible stains.
- Reflashing is suitable if sheathing is sound and failure is limited; larger issues like valley corrosion or rot require full rebuilds, especially on older roofs.
- Coastal exposure accelerates corrosion, so using aluminum or stainless steel flashing and maintaining all penetrations is crucial for long-term durability.
- Leaving leaks unaddressed risks extensive structural damage and costly repairs, making prompt professional inspection and targeted repairs essential.
Table of Contents
- What causes dormer leaks in West Vancouver homes?
- How to inspect and triage a dormer leak
- Reflash, rebuild, or replace: matching the repair to the damage
- BC code, materials and West Vancouver’s coastal factors
- When to call a professional (and what a good inspection looks like)
- How insurance handles dormer leak claims
- What happens if you ignore a dormer leak
- Maintenance schedule to keep dormers leak-free
- Prevention tips built for West Vancouver’s climate
- What dormer leak repairs typically cost in West Vancouver
- Author perspective: what Paragon sees most often
- How Paragon Roofing BC can help
- Sources
- FAQ
What causes dormer leaks in West Vancouver homes?
Dormers create more roof edges, valleys, and wall intersections per square foot than any other feature on a pitched roof. Every one of those transitions is a place water can get behind the shingles, and flashing failures are consistently the most common origin point for leaks that show up as ceiling stains weeks or months after the water actually got in.
Step flashing installed too short, or nailed straight through instead of interleaved with each shingle course, is the single most frequent culprit we find on West Vancouver dormer inspections. When step flashing fails, water runs down the sidewall behind the cladding rather than shedding onto the roof surface, and by the time you see a stain the damage has usually spread beyond the flashing itself.
Valley flashing takes the second spot on our list, especially on older homes where the metal has thinned from years of salt-laden moisture. Debris dams (needles, moss clumps, small branches) sitting in a valley hold water against the metal far longer than it was ever designed to tolerate, and a short or improperly lapped valley run gives that pooled water a direct route under the shingles.
Kick-out flashing is the detail almost every inspection turns up missing entirely. This small L-shaped piece redirects water off the roof edge and away from the wall below; without it, water runs straight down the sheathing and into the wall cavity, which is why homeowners sometimes find water stains on an interior wall two storeys below the dormer with no visible roof damage at all.
The remaining causes tend to compound each other rather than act alone:
- Caulk and sealant around dormer windows and flashing joints breaking down after 8 to 12 years of coastal UV and salt exposure
- Moss and organic debris trapping moisture against flashing metal, accelerating corrosion in exactly the spots you can’t see from the ground
- Window perimeter seals failing where the dormer wall meets the window frame, often mistaken for a roof leak when it’s actually a wall issue
- Wind-driven rain forcing water sideways under shingle laps that would shed a normal vertical rainfall without issue
West Vancouver’s exposure to Howe Sound means salt air and wind-driven rain accelerate corrosion on metal flashing and fasteners faster than almost anywhere else in Metro Vancouver, which is a big part of why a 15-year-old flashing job on a sheltered Burnaby roof might still be sound while a similar-aged dormer above the Sound is already failing.
How to inspect and triage a dormer leak
A dormer leak rarely announces itself where the water actually entered, so a methodical check matters more than a quick glance at the ceiling stain.
Start inside. Look for ceiling discolouration, bubbled paint, or a musty smell near the dormer, and check the attic space directly behind the dormer wall for dampness, mould, or daylight showing through gaps around the flashing. A flashlight and a moment of patience up there tells you more than most homeowners expect.
- Document the interior signs first. Photograph every stain, bubble, or damp patch with a timestamp, and note the date and weather conditions when you first noticed it.
- Check the attic before the exterior. Trace any dampness back toward its highest point; water almost always travels downhill along framing before it shows up as a stain, so the wet insulation is rarely directly above the ceiling mark.
- Look at ventilation while you’re up there. Blocked soffit vents or insulation stuffed against the roof deck trap moisture and mimic leak symptoms, so rule that out before assuming it’s a flashing failure.
- Do a ground-level exterior check only. From the ground or a ladder against a wall (never the roof itself in wet or windy conditions), look for visibly lifted shingles, rusted valley metal, or debris pooling near the dormer.
- Photograph everything exterior you can safely see. Contractors and insurance adjusters both work faster and more accurately from clear, dated photos than from a verbal description.
- Apply temporary mitigation only. Clear gutters and downspouts near the dormer and, if the leak is active, use a tarp weighted at the ridge, not nailed through the roof, to buy time until a professional arrives.
Pro Tip: Never try to reseal step flashing or valley metal yourself with a tube of roofing cement. It looks like a fix, but it traps moisture against the metal and often hides the real problem from the next inspector, which can turn a $600 reflash into a $4,000 sheathing replacement six months later.
Getting onto a steep dormer roof in the rain is how West Vancouver homeowners end up with a second, unrelated problem. Leave the roof-surface work to someone with the harness, the ladder stabilizer, and the experience to know where flashing typically fails on a dormer before they even climb up.
Reflash, rebuild, or replace: matching the repair to the damage
A targeted reflash is the right call when the sheathing underneath is still dry and sound. That job involves removing the affected shingles, replacing step flashing along the sidewalls, installing kick-out flashing where it’s missing, and resealing the window perimeter with a proper coastal-grade sealant. Done correctly, this is a contained, single-day repair on most dormers.
The scope grows when the valley itself has failed rather than just the step flashing beside it. A corroded or undersized valley usually needs a full rebuild, and on dormers that collect runoff from two roof planes, a cricket (a small diverter ridge built behind the dormer) is often added at that point to keep water from pooling against the wall in the first place.
Signs the job has moved past a simple reflash:
- Soft or springy sheathing when you press on it from the attic side
- A musty, persistent smell that does not clear after a dry week
- Discoloured or crumbling framing members visible once shingles are pulled back
- More than one failure point (say, both a valley and the kick-out flashing) discovered during the same inspection
Roof age changes the calculation, too. A dormer leak on a 6-year-old roof is almost always an installation defect worth fixing directly. The same leak on an 18-year-old roof, alongside granule loss and brittle underlayment elsewhere, often makes more financial sense to address as part of a broader reroof rather than a repeated series of patches. Our practical approach is staged: stop the active water first with emergency mitigation, diagnose the actual scope, then decide between a targeted repair and a larger reroofing project based on what the inspection actually finds, not what looks fastest from the ground.
BC code, materials and West Vancouver’s coastal factors
The BC Building Code sets 4:12 as the standard pitch for conventional asphalt shingle roofing, and most West Vancouver dormers meet or exceed that slope. Slopes between 2:12 and 4:12 fall into low-slope territory, and the code requires enhanced underlayment or a continuous waterproof membrane in that range rather than standard shingle underlayment, which matters if your dormer has a shallower cheek wall or shed roof than the main structure.
Ventilation is the part homeowners forget until it becomes a second problem layered on top of the first. The code’s 1:300 attic ventilation ratio (one square foot of vent area per 300 square feet of attic floor) exists specifically to keep moisture from condensing against the roof deck, and renovations that block soffit vents or add insulation without adjusting ventilation are a common, avoidable cause of hidden sheathing rot in coastal BC homes, dormer additions included.

For material selection, coastal exposure changes the recommendation. Aluminium or stainless steel flashing and matching corrosion-resistant fasteners hold up far better against salt air than standard galvanized steel, which can start showing pitting and rust within a decade in exposed West Vancouver locations. On low-slope dormer sections, a membrane underlayment rather than felt paper gives you a real margin against the wind-driven rain that pushes water uphill under shingle laps.
Site protection matters practically, too. The District of West Vancouver’s building bylaw.pdf) allows the municipality to deduct cleanup costs from a security deposit if construction debris fouls streets or drains, so any contractor working on your dormer should already have a site protection plan before the first shingle comes off.
When to call a professional (and what a good inspection looks like)
Some situations don’t leave room for a wait-and-see approach. Call a roofer the same day if you have an active leak during a storm, soft or spongy framing you can feel from the attic, visible mould growth, or interior damage spreading beyond a single ceiling patch.
- Expect the inspector to lift shingles, not just look at them. A proper inspection includes testing suspect flashing and sheathing directly rather than relying on a surface glance and a tube of sealant.
- A moisture meter reading should back up any diagnosis. Ask to see the readings, not just hear “it’s wet.”
- Attic mapping matters for anything beyond a single obvious leak. The inspector should trace the water path, not just patch where it’s staining.
- Vet the contractor before they climb your roof. Ask about West Vancouver dormer experience specifically, current liability insurance, and whether they provide a written report with photos.
- Get the deliverable in writing. A credible inspection ends with a documented scope of work, not a verbal “you’re fine” or a vague estimate texted the next day.
Our inspection process for West Vancouver homes always starts with lifting the shingles around the dormer sidewalls before we quote anything, because guessing at scope from the ground is how homeowners end up paying twice.
How insurance handles dormer leak claims
Home insurance in BC generally covers sudden and accidental water damage, but a dormer leak that’s been dripping quietly for months often gets classified differently than a storm-driven emergency. Adjusters look closely at whether the damage stems from a sudden event (a storm ripping flashing loose) or from gradual deterioration (worn sealant that’s been failing for years), and the second category is frequently excluded or only partially covered under standard policies.
This is exactly why photo documentation from the moment you notice a stain matters so much. A dated photo record showing the leak’s progression, combined with a professional’s written inspection report identifying the specific failure point, gives your adjuster something concrete to work with instead of a dispute over when the damage actually started.
Some insurers also request proof of reasonable maintenance before approving a claim, particularly for older roofs. If moss buildup or a known missing kick-out flashing contributed to the leak and there’s no record you’d addressed it, that can affect the payout. Ask your broker directly whether your policy distinguishes between sudden water damage and long-term seepage, and keep any past inspection reports on file. It’s a five-minute conversation that can save you a denied claim months later.
What happens if you ignore a dormer leak
A slow dormer leak rarely stays small. Water that enters at the flashing travels along framing members, and by the time you see a stain, moisture has often been sitting in the wall cavity or attic insulation for weeks or months already.
Left unaddressed, that moisture leads to a fairly predictable sequence: insulation loses its effectiveness once saturated, framing lumber starts to soften and eventually rot, and mould colonies establish themselves in a dark, damp wall cavity within as little as 24 to 48 hours of sustained moisture exposure. None of that reverses itself once you finally reseal the flashing.
The financial escalation is the part that catches most homeowners off guard. A modestly priced reflash addressed early can turn into a multi-thousand-dollar sheathing and framing replacement if the leak runs long enough, and in the worst cases we’ve seen, prolonged moisture intrusion has compromised structural framing enough to require partial wall rebuilding, not just a roof repair. Mould remediation alone, once it’s established in wall cavities, typically costs more than the original flashing fix would have.
There’s also a resale angle worth considering. A pre-listing inspection that turns up unresolved water staining or repaired-but-undocumented leak damage tends to spook buyers and their own inspectors, often triggering a larger price reduction than the actual repair would have cost.
Maintenance schedule to keep dormers leak-free
Twice-yearly inspections, once in early fall before the wet season and again in late spring, catch most dormer problems while they’re still cheap to fix. Add a third check after any windstorm strong enough to bring down branches in your neighbourhood.
A practical seasonal routine looks like this:
- Fall (September/October): Clear moss and debris from valleys and behind the dormer, check gutters and downspouts are flowing freely, and look for lifted shingles before the heavy rains start.
- Spring (April/May): Inspect for winter damage, check caulking around dormer windows and flashing joints for cracking, and confirm attic ventilation hasn’t been blocked by shifted insulation.
- After major windstorms: A quick visual check from the ground for displaced shingles or damaged flashing, especially on the windward-facing dormer walls.
- Every 2 to 3 years: A full professional inspection that includes lifting shingles near flashing points, not just a visual scan.
Sealant and caulk around dormer penetrations typically need refreshing more frequently on the coast due to UV and salt exposure, sooner than the 10 to 12 years you might get inland, simply because salt air and UV exposure break down sealant compounds faster here than in less exposed parts of Metro Vancouver.
Prevention tips built for West Vancouver’s climate
West Vancouver’s combination of high annual rainfall, near-constant wind off the Sound, and salt-laden air means prevention has to account for more than a typical Lower Mainland roof. Standard maintenance advice written for drier or more sheltered communities often underestimates how fast coastal exposure degrades flashing and sealant here.
Choose corrosion-resistant flashing materials from the start rather than waiting for standard galvanized flashing to fail. Aluminium or stainless steel costs more upfront but holds up considerably longer against salt air, and on a dormer where flashing failure is the single biggest risk, that material choice pays for itself.
Keep moss under control proactively rather than reactively. Moss doesn’t just look unsightly. It traps moisture directly against flashing and shingles, and in West Vancouver’s wet, shaded pockets under tree cover, moss growth accelerates faster than in sunnier parts of Metro Vancouver. Scheduled moss cleaning and treatment before it establishes a thick mat protects the flashing underneath it.
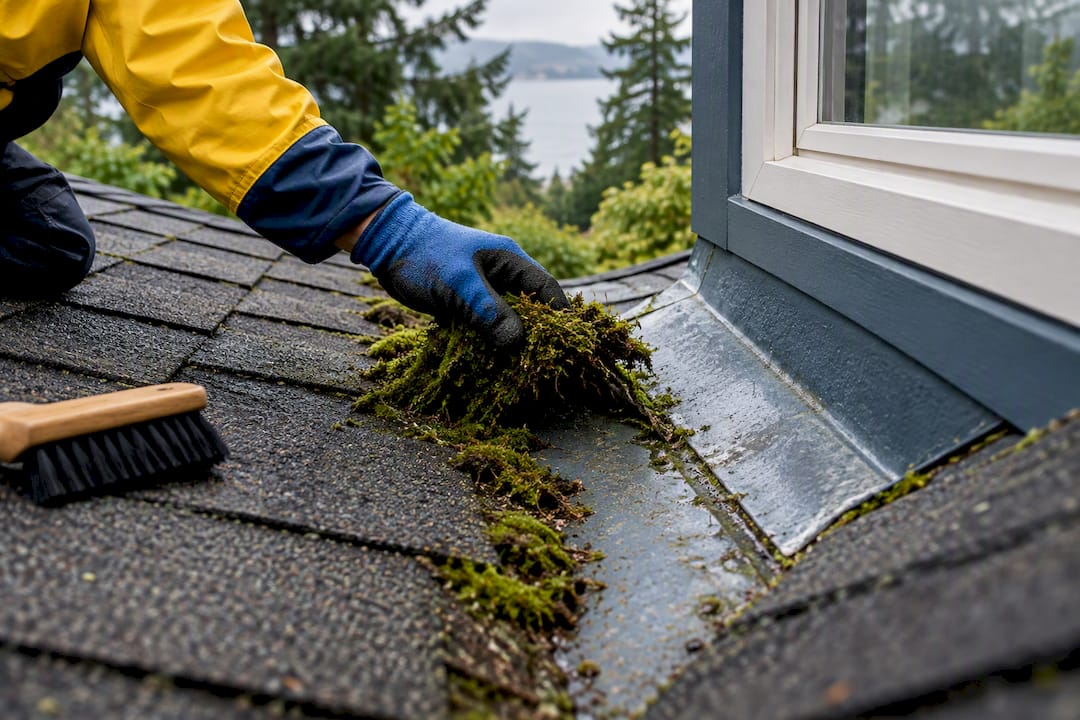
Finally, confirm your dormer’s ventilation is adequate and not compromised. A finished attic space or added insulation that blocked soffit vents is one of the most common, avoidable causes of hidden rot behind a dormer wall, and it’s invisible until someone actually checks.
What dormer leak repairs typically cost in West Vancouver
Repair costs on a dormer leak vary widely depending on scope, and homeowner-facing repair examples show a significant range between a simple reflash and a full sheathing or framing replacement, which is often only revealed once the damaged materials are exposed.
A targeted reflash, covering step flashing replacement, kick-out flashing installation, and resealing around the window perimeter, sits at the lower end of the cost range and is usually completed in a single day. Valley rebuilds cost more, since they involve removing a wider section of shingles and replacing the valley metal itself, sometimes with a cricket added to redirect water flow.
The number moves considerably higher once hidden rot enters the picture. Sheathing replacement, and especially framing repair, requires opening up the roof structure, and the final cost depends entirely on how far the rot has spread before anyone caught it, which is precisely why early inspection saves money rather than just satisfying curiosity. A homeowner who calls at the first stain almost always pays less in total than one who waits until the ceiling sags.
Strata properties add another variable: shared roof sections mean a dormer leak on one unit’s wall can trigger a documentation and approval process before repairs proceed, which is worth factoring into your timeline expectations if you’re on a strata council.
Author perspective: what Paragon sees most often
I’ve walked enough West Vancouver attics to notice a pattern: the leak almost never starts where the stain shows up. Three mistakes come up again and again in past work we’re called to fix. Contractors skip kick-out flashing because it takes an extra ten minutes. They reseal over failed step flashing instead of replacing it. And they use standard galvanized metal on an exposed coastal dormer where it has no business lasting more than a decade.
My priority order never changes: stop the active water first, diagnose the real source before touching anything permanent, then repair with materials built for salt air, not the cheapest option on the shelf. Skip the diagnosis step and you’re just paying to have the same leak again in three years.
— Harman
How Paragon Roofing BC can help
Paragon Roofing BC is the direct alternative to guessing at a dormer leak yourself or hiring a generalist who reseals the surface instead of finding the actual failure point. We inspect West Vancouver dormers by lifting shingles at the flashing, testing sheathing moisture, and mapping the leak path back to its source, then give you a written scope before any work starts, whether that’s a targeted reflash, a valley rebuild, or full sheathing and framing repair.

What sets our approach apart on the coast is material selection: we specify corrosion-resistant flashing and membrane underlayment suited to salt air and wind-driven rain, not whatever’s fastest off the truck. For strata properties, we also provide the documented inspection reports councils need for approval and insurance purposes. If you’re on a strata council managing shared roof sections, our strata and multifamily roofing services team handles the documentation piece directly.
If you’re seeing a stain near a dormer, consider having it inspected before the next storm. Reach out through our residential roofing services page and describe what you’re seeing, when it started, and any photos you’ve already taken. That’s enough for us to schedule an inspection and give you a real answer instead of another guess.
Sources
FAQ
What is the typical lifespan of a dormer roof?
A dormer’s roofing surface typically lasts as long as the main roof it’s attached to, often around 20 years for asphalt shingles, but the flashing around it frequently fails sooner because it takes the brunt of wind-driven rain and movement between the dormer wall and the main roof plane. In West Vancouver’s coastal exposure, flashing often needs attention well before the shingles themselves are due for replacement.
Is $30,000 too much for a roof?
It depends entirely on the roof’s size, pitch, material, and complexity. A large or steep roof with multiple dormers, valleys, and coastal-grade materials like aluminium flashing and enhanced underlayment can reasonably reach that range, while a smaller, simpler roof would not. Current pricing for specific projects is available through Paragon Roofing BC’s residential services after an on-site assessment.
What does a roof replacement typically cost in Vancouver, BC?
Roof replacement costs vary by material, roof size, pitch, and site access, with asphalt shingle roofs generally costing less than cedar shake or standing-seam metal systems. Current project pricing is best confirmed through a direct quote, since factors like dormer count, low-slope sections, and coastal material upgrades all shift the total.
My roof is 20 years old. Should I replace it?
A 20-year-old asphalt shingle roof is approaching the end of its typical service life, especially in a coastal climate where salt air and wind-driven rain accelerate wear on flashing and sealant. If you’re also seeing recurring dormer leaks, granule loss, or brittle shingles elsewhere, a full inspection will tell you whether targeted repairs still make sense or whether reroofing is the more cost-effective path forward.
How do I know if my dormer leak needs a reflash or a full repair?
If the sheathing underneath is dry and the failure is limited to step flashing, kick-out flashing, or sealant, a targeted reflash usually resolves it in a single day. Soft framing, persistent musty odours, or multiple failure points found during inspection are signs the repair needs to expand beyond a simple reflash.
Recommended
Our Roofing Blog

Have more questions about roofing?
Check out our FAQs or give us a call today to speak to an expert roofer in Vancouver Lower Mainland, BC. We're here to help our neighbours make educated decisions about their roof. For our team, we value helping clients save money while making their roofs last.
