Roof Penetrations 101 — Best Practices & Leak Prevention
Table of Contents
- Why Roof Penetrations Are One of the Most Common Leak Sources
- Common Types of Roof Penetrations (and How They Differ)
- How Proper Penetration Waterproofing Is Supposed to Work
- The Most Common Penetration Mistakes We See in Vancouver
- How Penetration Leaks Typically Show Up Inside the Home
- How We Handle Roof Penetrations to Prevent Leaks Long-Term
- When Roof Penetrations Should Be Inspected or Upgraded
- Recommended links
Key Takeaways
| What matters most | Vancouver reality | What to do about it |
|---|---|---|
| Penetrations are system interruptions | Wind-driven rain and long wet seasons exploit small weak points | Detail penetrations as layered assemblies, not “sealant jobs” |
| Most failures are sequencing and fastener errors | Small mistakes become chronic leaks during specific storm angles | Keep fasteners out of water paths and follow correct overlap logic |
| Components age faster than the roof field | Boots, sealants, and thin flashings often fail long before shingles/metal | Replace aging flashings/boots during re-roofing as standard practice |
| Interior stains rarely point to the true entry point | Water can travel along decking, framing, and insulation before showing | Inspect the penetration detail itself, not just the ceiling stain location |
Why Roof Penetrations Are One of the Most Common Leak Sources
Roof penetrations are one of the most underestimated components of any roofing system. They’re small, they’re common, and they’re unavoidable—but they’re also responsible for a disproportionate number of leaks, rot issues, and long-term roof failures. In Vancouver’s climate, where wind-driven rain and prolonged moisture exposure are the norm, penetration detailing is often the difference between a roof that quietly performs for decades and one that becomes a recurring problem.
Every roof penetration is, quite literally, a hole cut through the roof system. No matter how durable the shingles, metal panels, or membranes may be, a penetration interrupts the continuous waterproof layer that the roof relies on to shed water safely.
Most roofs don’t fail in wide, open areas. They fail at details —the transitions, overlaps, and interruptions where materials meet. Penetrations concentrate all of these risks into a very small footprint. A single pipe or vent can expose the roof to water intrusion from multiple directions at once.
Vancouver’s wind-driven rain makes this even more critical. Rain here doesn’t simply fall straight down. Strong coastal winds push water sideways, force it uphill, and drive it under edges that might never be tested in calmer climates. A penetration that seems perfectly fine during light rain can leak aggressively during storms.
Penetrations also tend to fail sooner than surrounding roofing materials. Shingles may be rated for 25–30 years, and metal roofs far longer, but the components around penetrations—rubber boots, sealants, thin flashings—often degrade much faster. UV exposure, temperature cycling, and constant moisture cause cracking, shrinkage, and loss of elasticity long before the rest of the roof shows visible wear.
What makes penetration leaks especially frustrating is that small installation errors rarely cause immediate failure. A fastener placed a few centimeters too close to a water path, a boot stretched too tightly, or flashing installed in the wrong sequence may not leak for months or even years. Instead, these mistakes turn into chronic, intermittent leaks—showing up only during heavy rain, strong wind, or specific storm angles—making them difficult to trace and even harder to permanently fix.
Common Types of Roof Penetrations (and How They Differ)
Not all penetrations behave the same way, and treating them as interchangeable is a major source of roofing problems. Each type interacts differently with water, wind, heat, and movement.
Plumbing vents are typically vertical pipes that extend straight through the roof. They’re exposed to water running directly down the pipe and pooling around the base. Rubber or composite boots must seal tightly without cracking or shrinking, and the flashing beneath must direct water away even if the boot eventually ages.
Bathroom and kitchen exhaust vents introduce another layer of complexity. In addition to exterior rain, they deal with warm, moist air exiting the home. This creates condensation risk around the penetration, especially during colder months. Poor detailing can allow moisture to enter from above while also trapping moisture from below.
Furnace and flue penetrations experience significant temperature changes. Hot exhaust gases cause expansion, while cold exterior conditions cause contraction. Flashing systems here must accommodate constant movement without relying on rigid sealants that eventually crack.
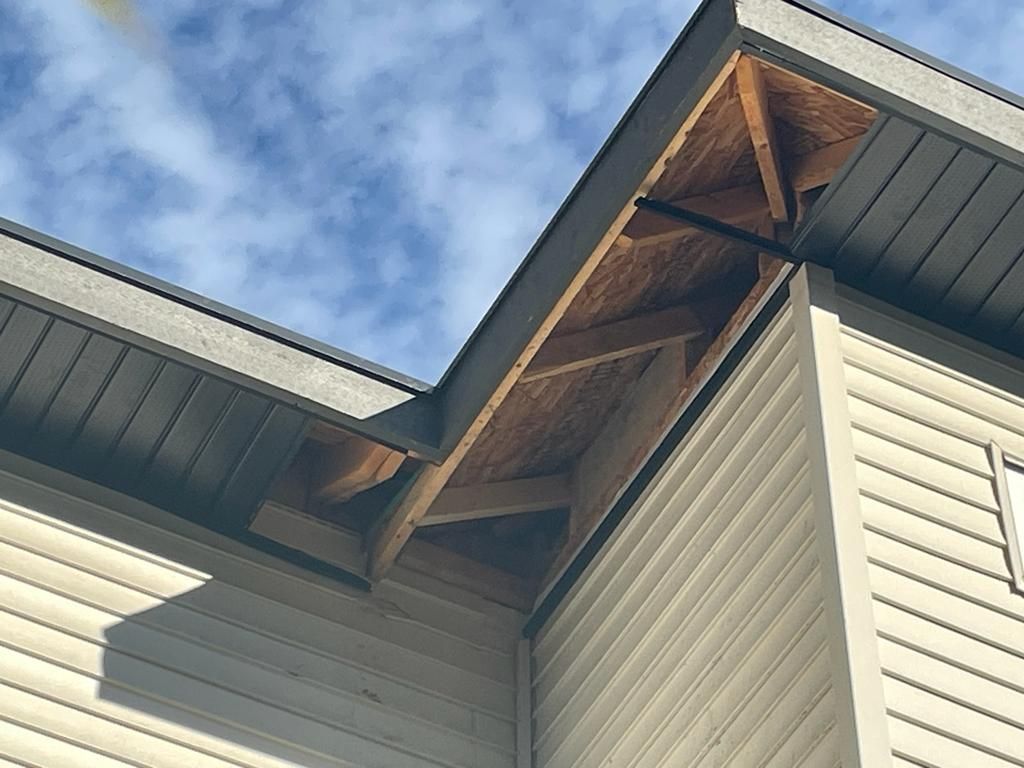
Skylights and roof hatches are among the highest-risk penetrations because of their size and shape. They introduce multiple seams, corners, and transitions, often intersecting with roof slopes or valleys. These assemblies depend on layered flashing systems and precise sequencing—caulking alone will never keep them watertight long-term.
Satellite mounts, solar attachments, and accessory penetrations are frequently installed after the roof is completed, often by non-roofing trades. Exposed fasteners, improper flashing, and incompatible materials make these penetrations a common starting point for future leaks if not handled correctly.
Each penetration behaves differently in rain and wind, which is why best practice requires penetration-specific detailing rather than generic solutions.
How Proper Penetration Waterproofing Is Supposed to Work
Effective penetration waterproofing is not about a single piece of flashing or a bead of sealant. It’s about layering, sequencing, and redundancy.
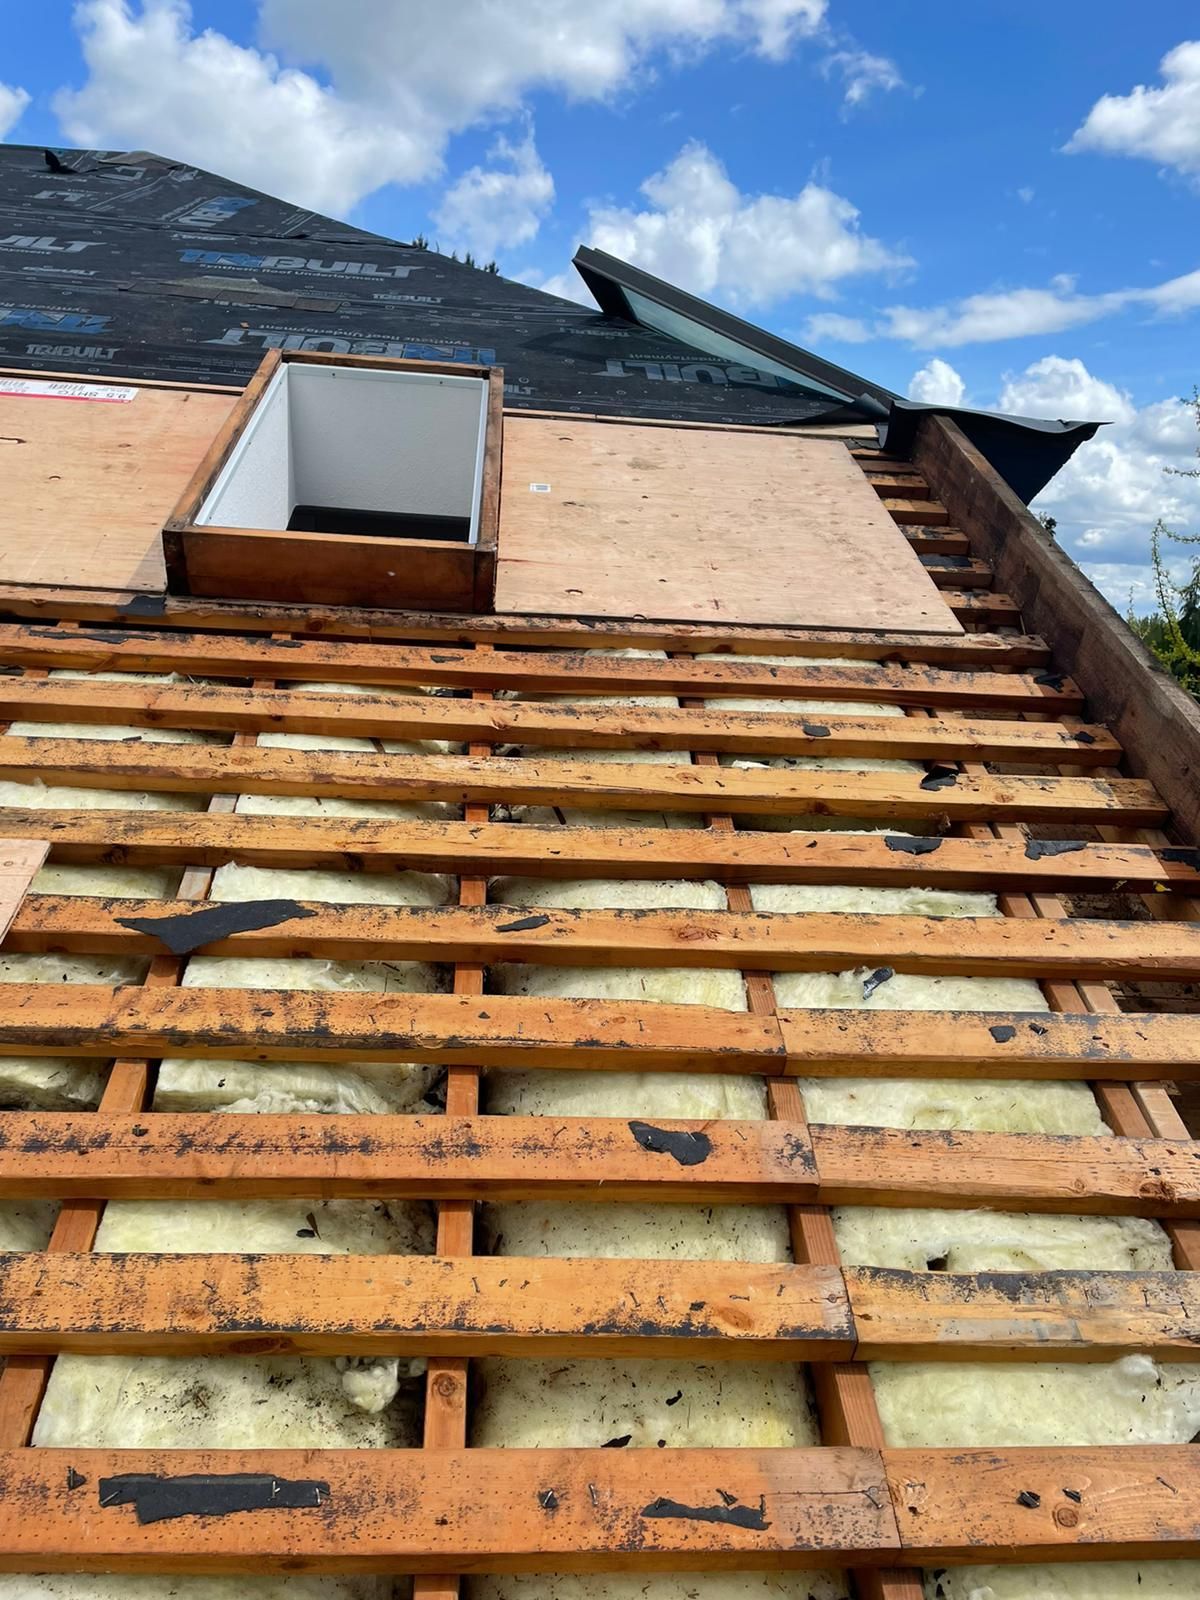
Flashing must be understood as a system. Underlayment, ice and water membrane, flashing components, and the roofing material itself all work together to redirect water safely away from the opening. When done correctly, water is always guided back onto the roof surface and off the structure—never trapped or blocked.
The correct sequence matters:
- The roof deck provides structural support
- Waterproof membrane protects the deck
- Flashing integrates the penetration into the membrane
- Roofing materials shed bulk water away
If this order is reversed or shortcuts are taken, water will eventually find a path inward.
One of the most important principles is understanding that sealant is not a primary defense. Sealants degrade. They crack under UV exposure, shrink with temperature changes, and lose adhesion over time. Proper penetration detailing assumes sealant will eventually fail—and ensures the system still sheds water safely when it does.
Movement must also be accounted for. Roof decks, pipes, and metal components expand and contract at different rates. Penetration systems must allow for this movement without tearing membranes or breaking seals. Flexible, layered assemblies outperform rigid, over-sealed details every time, especially in Vancouver’s fluctuating weather conditions.
When penetration waterproofing is done properly, the penetration effectively becomes part of the roof system rather than a weak point within it.
The Most Common Penetration Mistakes We See in Vancouver
Roof penetrations fail far more often because of installation shortcuts than because of material defects. In Vancouver, where roofs are exposed to persistent moisture and wind-driven rain, even small mistakes become magnified over time. These are the issues we encounter most frequently when investigating leaks.
One of the biggest problems is generic or incorrect flashing being used for the penetration type. Not all vents, pipes, or exhausts behave the same way, yet many roofs are detailed with one-size-fits-all flashings. A plumbing vent flashing used on a high-heat flue, or a basic boot installed where heavy wind exposure exists, is almost guaranteed to fail prematurely. Each penetration requires a flashing designed for its specific movement, temperature, and exposure conditions.
Another common issue is fasteners placed in active water paths. Nails or screws driven too close to the uphill side of a penetration, or directly through flashing where water flows, create immediate vulnerability. These fasteners may hold initially, but once the surrounding material expands, contracts, or corrodes, water begins tracking along the fastener shaft and into the roof assembly.
Many penetration failures stem from over-reliance on caulking. Caulking is often used as a substitute for proper flashing rather than a supplementary measure. In Vancouver’s UV exposure and constant moisture, sealants degrade quickly. Once they crack or pull away, there is nothing underneath to stop water from entering.
Rubber boots are another frequent weak point. Over time, UV exposure causes rubber to dry out, crack, and shrink. Even if the surrounding shingles or metal panels are in good condition, a failed boot can allow water directly onto the roof deck. These failures are especially common on roofs that are otherwise mid-life and appear visually sound.
Finally, we regularly see old penetrations left in place during roof replacement. Re-roofing over aging flashings or boots may save time initially, but it almost always leads to leaks well before the new roof reaches the end of its lifespan. A new roof is only as reliable as its weakest penetration detail.
How Penetration Leaks Typically Show Up Inside the Home
One of the reasons penetration leaks are so difficult for homeowners to diagnose is that the visible damage rarely appears directly below the penetration. Water can travel along roof decking, framing members, or insulation before finally showing up as a stain or drip far from its entry point.
Many penetration leaks are intermittent, appearing only during heavy rain, wind-driven storms, or specific weather conditions. A roof may seem perfectly dry for months, only to leak during a single intense storm. This leads to confusion and often misdiagnosis.
Ceiling stains caused by penetration leaks frequently dry out and return, giving the impression that the problem has resolved itself. In reality, moisture is continuing to enter the roof system and evaporate between rain events, slowly causing rot, mold growth, and insulation damage above the ceiling.
Because the symptoms are inconsistent, homeowners often experience repeat “repairs” that never solve the issue. Sealant is reapplied, shingles are patched, or interior drywall is repaired—without addressing the root cause at the penetration itself. Over time, this cycle leads to more extensive structural damage and higher repair costs.
How We Handle Roof Penetrations to Prevent Leaks Long-Term
Our approach to roof penetrations is based on the understanding that every penetration is a critical detail, not a minor accessory. Each one is evaluated individually based on exposure, roof slope, material type, and expected movement.
We use penetration-specific flashing systems designed for each application—plumbing, exhaust, flue, skylight, or accessory mount. These systems are selected to handle Vancouver’s moisture levels and wind exposure rather than relying on generic components.
Fasteners are carefully placed so there are no nails or screws in active water zones. Where fastening is unavoidable, it is done in locations protected by overlapping materials and secondary waterproofing layers.
During re-roofing, aging boots and flashings are replaced as a standard practice, not treated as optional upgrades. This ensures the new roof system performs as a complete assembly rather than being compromised by older components.
Penetrations are fully integrated with underlayment, ice and water protection, and roofing materials, following proper sequencing so water is always directed outward. This layered approach ensures that even if one component degrades over time, the system continues to shed water safely.
We also provide photo documentation of penetration details during installation. This transparency allows homeowners to see exactly how their roof has been detailed and gives confidence that the work goes beyond surface-level fixes.
When Roof Penetrations Should Be Inspected or Upgraded
Roof penetrations should always be evaluated before or during any roof replacement. This is the best opportunity to address aging components, correct past installation issues, and integrate penetrations properly into the new roof system.
If leaks recur near the same area—especially after previous repairs—it’s a strong indicator that a penetration issue has been overlooked. Penetrations should also be inspected after new equipment installations, as improper third-party work is a common source of future leaks.
Visible signs like cracking, shrinking, or discoloration of rubber boots are clear warnings that failure is imminent, even if active leaking hasn’t started yet.
Finally, penetrations should be assessed as part of routine roof inspections, particularly in Vancouver’s climate. Early detection of minor penetration issues can prevent significant structural damage and extend the life of the entire roof system.
Handled correctly, roof penetrations don’t have to be a chronic problem. With proper design, materials, and execution, they can perform reliably for decades—even under the demanding conditions of the Lower Mainland.