
Burnaby attic condensation damage: what it looks like and what to do
Burnaby attic condensation damage: what it looks like and what to do
Dark pepper-like speckling on the underside of your roof sheathing, fuzzy grey or green colonies near the soffits, rusted nail heads, and insulation that feels wet or compacted — these are the most reliable signs of attic condensation damage in Burnaby homes. If you spot any of them, the immediate steps are straightforward:
- Photograph everything before touching anything. Wide shots of the bay, close-ups of staining, and any visible mould colonies give an inspector a baseline.
- Limit attic access until you have a professional moisture assessment. Disturbing mouldy material spreads spores through the house.
- Book a moisture check or professional attic inspection as soon as possible. Active dripping, widespread mould on structural wood, or soft sheathing are not situations to monitor and wait on.
Pro Tip: Visible mould on structural framing or sheathing is not a DIY bleach-and-forget job. A professional needs to confirm the moisture source, take meter readings, and clear the assembly before you close anything up.
Key takeaways
Burnaby attic condensation damage is driven primarily by interior air leakage and exhaust ducts terminating in the attic, compounded by a cool marine climate that limits drying capacity and drives night-sky condensation on north-facing sheathing.
| Point | Details |
|---|---|
| Visual signs to look for | Pepper-like speckling, fuzzy mould colonies, rusted nail heads, wet or compacted insulation, and soft sheathing. |
| Moisture threshold that matters | RDH monitoring recorded sheathing moisture contents of 20–30% in winter; readings above 20% are a cautionary level for fungal growth. |
| Top prevention priority | Seal air leaks at the ceiling plane and confirm all exhaust ducts terminate outdoors before each wet season. |
| Ventilation is not enough alone | In cool marine climates, adding vents without fixing air leakage can increase sheathing moisture pickup. |
| Paragonroofingbc next step | Book a moisture assessment that includes meter readings, thermal imaging, and a written report with documented findings. |
Table of Contents
- What does attic condensation damage actually look like in Burnaby?
- Why do Burnaby attics develop condensation in the first place?
- How does a competent inspection find and measure the damage?
- How quickly does condensation damage get worse?
- What can you safely do before the inspector arrives?
- What does professional repair and remediation actually involve?
- Seasonal checklist to prevent condensation coming back
- What does local building science say about attic wetting in cool marine climates?
- When should you stop monitoring and call a professional?
- A local inspector’s perspective on what actually matters
- Paragonroofingbc handles Burnaby attic moisture from inspection to repair
- Sources
- FAQ
What does attic condensation damage actually look like in Burnaby?
Burnaby attic condensation damage examples tend to cluster around a handful of very recognisable signs, and knowing what you’re looking at makes the difference between a quick repair and a full sheathing replacement.
Pepper-like speckling is usually the first thing you notice. These are tiny dark dots — black, brown, or dark grey — scattered across the underside of the OSB or plywood sheathing. They look almost like someone flicked a fine-tipped marker across the wood. Old water staining from a past roof leak tends to be larger, irregular, and concentrated along a single run; condensation speckling is more diffuse and often covers whole bays uniformly. HIABC field investigations confirm that these indicators, along with rusted nail heads, are the most common visual signs in our region, and they’re typically worse on north-facing slopes where the sun never gets a chance to dry things out.
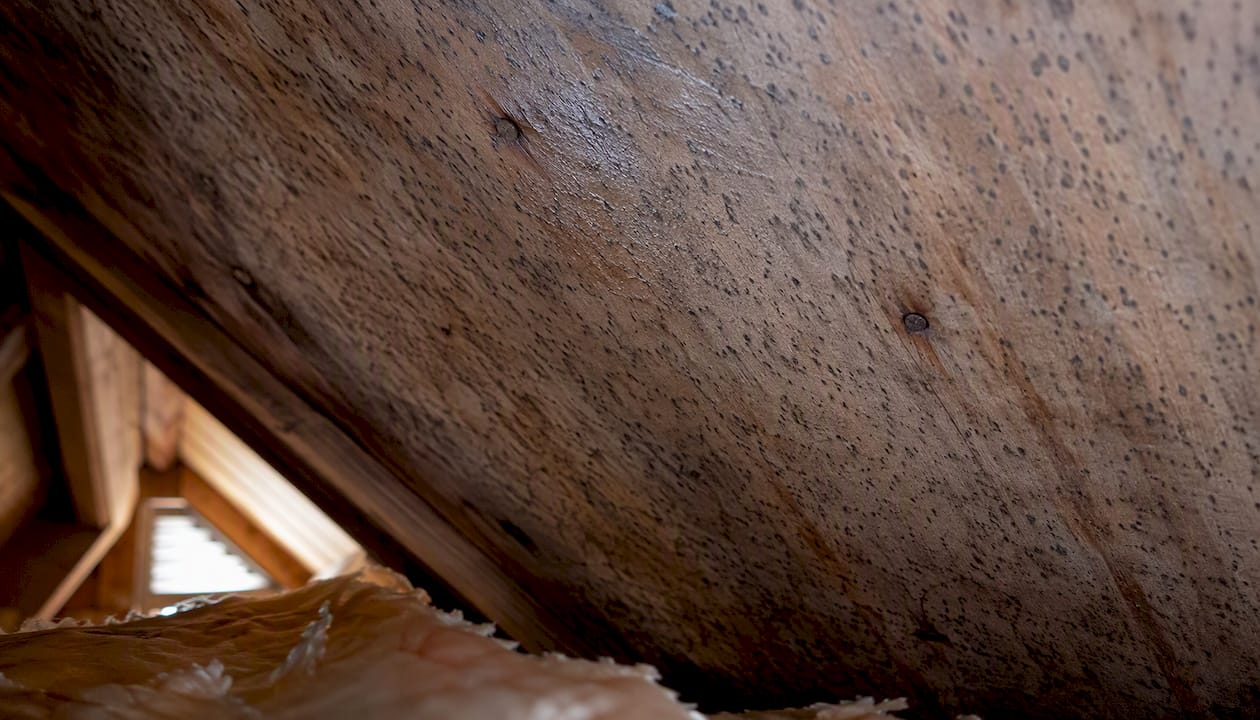
Fuzzy or powdery growth comes next as moisture exposure continues. You’ll see white, grey, or greenish colonies, often powdery to the eye, appearing near soffit junctions, along the low edges of rafter bays, and on the north side of the attic. These colonies are surface mould feeding on the wood fibres. They’re not always black, which surprises homeowners who expect dramatic dark patches.
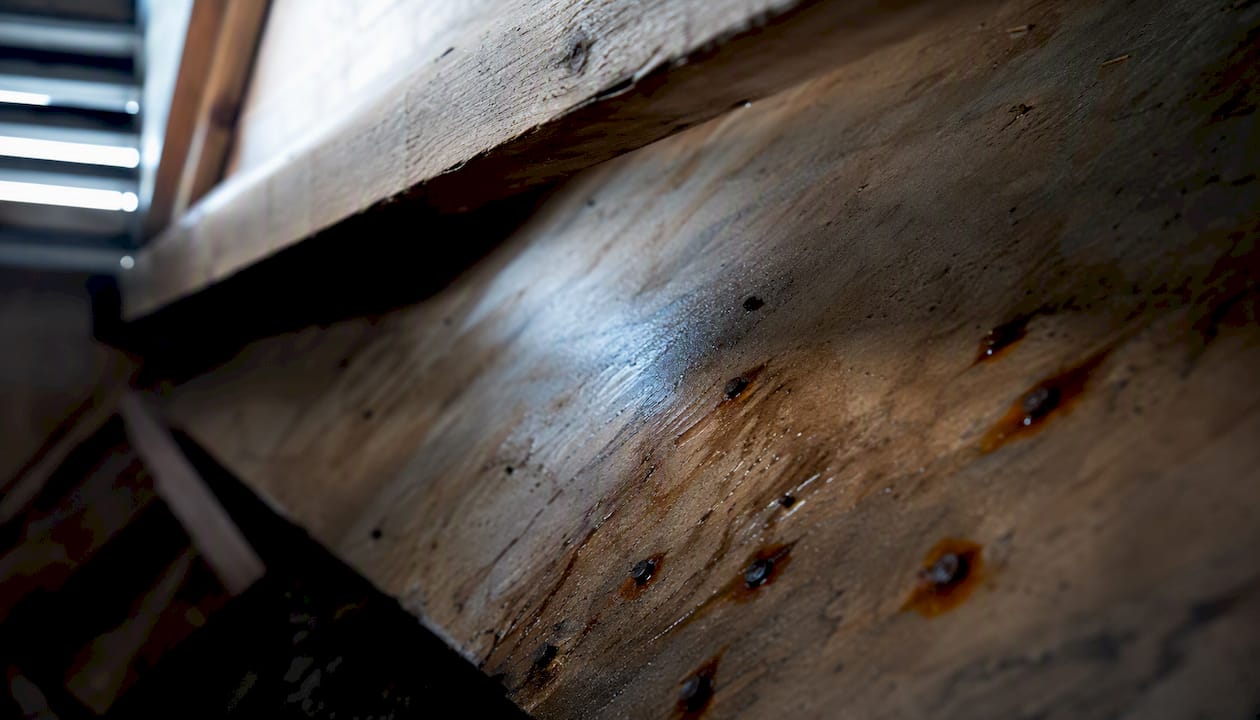
Rusted nail heads are one of the subtler but most telling signs. When sheathing nails oxidise, it means liquid water has been sitting on the metal repeatedly. You’ll see orange-brown halos around each nail point on the underside of the sheathing. Paired with a wet sheen on the wood surface on a cold morning, this points to active or very recent condensation rather than a historic leak.
In the insulation below, look for compacted batts that have lost their loft, darkened fibres, and distinct wet spots. Blown-in insulation that has settled unevenly or formed a crust on top is another sign. Sheathing that feels soft or spongy when you press it — or that visibly sags between rafters — has absorbed enough moisture to begin structural degradation.
Pro Tip: During your inspection, prioritise photos of north-facing bays, soffit junctions, and the areas around any penetrations: chimneys, plumbing stacks, bathroom exhaust vents, and pot lights. These spots concentrate the damage first.
Why do Burnaby attics develop condensation in the first place?
The short answer is warm, humid indoor air finding its way into a cold attic space and hitting surfaces cold enough to trigger condensation. But the specific pathways and the local climate make Burnaby’s situation worth understanding in detail.
Interior air leakage is the most common culprit. Pot lights recessed into the ceiling, plumbing stack penetrations, attic hatch frames without weatherstripping, and bathroom exhaust fans with loose connections all act as channels. Warm, moisture-laden air from cooking, showering, and laundry pushes up through these gaps and hits cold sheathing. BC Housing’s attic ventilation and moisture guidance consistently identifies these interior air leakage paths, along with exhaust ducts that discharge directly into the attic rather than outdoors, as the primary drivers of attic moisture imbalance in Lower Mainland homes.
Exhaust ducts terminating in the attic are a surprisingly common problem, especially in older Burnaby houses and some strata townhouses. A bathroom fan or dryer duct that blows directly into the attic space dumps warm, saturated air right where you least want it. In winter, that air hits cold sheathing and condenses immediately.
- Air leakage through ceiling penetrations (pot lights, plumbing stacks, attic hatches)
- Exhaust ducts from bathrooms, kitchens, or dryers discharging into the attic space
- Blocked or missing soffit vents that prevent fresh air from entering the attic
- Missing or displaced baffles that allow insulation to block soffit airflow
- High indoor humidity from cooking, showering, or poorly vented laundry
Night-sky radiation condensation is a mechanism that catches many homeowners off guard. On clear, cold nights, roof sheathing radiates heat upward and cools below the outdoor air temperature. When humid outdoor air contacts that cold surface, condensation forms even without any interior air leakage. BC Housing’s research notes that these short, repeated condensation or frost events drive sharp spikes in sheathing moisture content, and they tend to align with clear nights followed by humid mornings — a pattern Burnaby sees regularly through November to March.
Burnaby’s cool marine climate compounds everything. The wet season is long, overcast, and humid, which means the attic gets very little solar drying. North slopes can go weeks without meaningful sun exposure. Field and modelling work from ORNL shows that in cool marine climates, ventilation alone may not prevent sheathing wetting because outdoor air itself carries enough moisture to contribute to condensation on cold surfaces. Adding vents without fixing air leakage and exhaust terminations can actually increase moisture pickup in well-insulated attics.
Excessive insulation depth can also shift the thermal profile of the sheathing, making it colder relative to the interior and raising condensation risk. This is worth knowing if you’ve recently upgraded insulation without also improving the air barrier.
How does a competent inspection find and measure the damage?
A thorough attic inspection for condensation damage is not a quick hatch peek. BC Housing guidance is clear that inaccessible areas — deep rafter bays and north slopes — are where critical indicators hide, and a hatch-level glance routinely underestimates severity.
Here’s what a competent inspector covers:
| Inspection Item | What They’re Looking For |
|---|---|
| Visual sweep of all elevations | Speckling, fuzzy growth, staining, rusted nails, soft sheathing |
| Exhaust duct termination check | Confirming every duct exits outdoors, not into the attic |
| Soffit vent condition | Blocked, missing, or painted-over vents that restrict airflow |
| Baffle inspection | Displaced or absent baffles allowing insulation to block soffit intake |
| Insulation condition | Compacted, wet, or darkened batts; settled blown-in material |
| Penetration audit | Pot lights, plumbing stacks, attic hatches checked for air sealing |
Moisture testing tools matter as much as the visual check. A non-contact infrared camera identifies cold spots on sheathing that correlate with condensation-prone zones, even before visible mould appears. Pin or pinless moisture meters give actual wood moisture content readings. Probe testing of sheathing confirms whether elevated readings are surface moisture or deep saturation.
RDH monitoring in the Lower Mainland recorded plywood sheathing moisture contents of approximately 20–30% during winter months, with mould growth appearing within the first year on underside sheathing even in ventilated test huts. Readings above 20% are a cautionary threshold; repeated spikes to 25–30% correlate with visible mould in local studies.
Inspectors prioritise areas that combine multiple risk indicators: visible staining plus a high meter reading plus a nearby air-leak path. That combination tells you the problem is active, not historic. When the picture is unclear, a blower door test can quantify total air leakage from the conditioned space into the attic.
How quickly does condensation damage get worse?
Condensation damage follows a predictable progression, and the timeline is faster than most homeowners expect in Burnaby’s wet climate.
- Short-term (first wet season): Surface staining appears on sheathing, minor mould colonies develop near soffits and on north-facing bays. Insulation may feel slightly damp. No structural concern yet, but the moisture source is active.
- Medium-term (one to three wet seasons): Insulation becomes saturated and loses thermal performance. Mould colonies spread across larger areas of sheathing. Odour becomes noticeable from the living space below. Nail heads show significant oxidation.
- Long-term (three or more wet seasons without intervention): Sheathing begins to soften and decay. Framing members show rot at contact points. Roof life shortens significantly. Structural integrity of the sheathing becomes a concern, and replacement rather than remediation becomes the only option.
Urgency red flags that mean you need an assessment now, not next month:
- Active dripping from the attic into the ceiling below
- Soft or visibly sagging sheathing when you press on it
- Widespread mould covering structural framing members, not just sheathing surface
- Repeated moisture meter readings above cautionary levels across multiple locations
- A musty odour in upper-floor rooms that worsens in wet weather
The health dimension matters too. Health Canada’s guidance on indoor humidity and mould underscores that mould in attic assemblies can affect occupant air quality, particularly when spores migrate through ceiling penetrations into living spaces. Children, elderly residents, and anyone with respiratory sensitivities are at elevated risk.
BC Housing’s retrofit guidance also notes that low-slope vented wood-frame assemblies in the Pacific Northwest show condensation-related staining and decay even when built to code — meaning the problem isn’t always a construction defect. It can be a climate-driven assembly behaviour that requires active management.
What can you safely do before the inspector arrives?
There are a few sensible steps you can take right now that limit damage and exposure without putting you in a position to make things worse.
Document first. Take photos from the attic hatch and, if safe, from inside the attic. Wide-angle shots of each bay, close-ups of any mould or staining, and photos of exhaust duct terminations give the inspector a useful baseline and protect you if an insurance conversation becomes necessary.
Stop adding moisture to the attic. If your bathroom fan or dryer duct terminates in the attic, stop using those appliances as much as possible until the duct is rerouted. This is the single fastest way to reduce active moisture loading.
Seal obvious duct leaks temporarily. If you can see a disconnected flex duct or a gap where a bathroom fan duct has pulled away from a fitting, foil tape (not standard duct tape) can hold it temporarily. This is a stopgap, not a fix.
Leave mouldy material alone. Do not brush, vacuum, or spray bleach on mould colonies on structural wood. Disturbing them releases spores. Surface sprays without fixing the moisture source are temporary at best and can mask the problem.
Safety gear if you must enter: wear an N95 or P100 respirator, nitrile gloves, and eye protection. Keep the attic hatch closed when you’re not actively in there.
These steps buy time. They do not replace air sealing, duct rerouting, or sheathing replacement when moisture content is already high. Following Health Canada’s practical measures for reducing indoor humidity — running exhaust fans properly, using a dehumidifier in damp seasons, and keeping indoor relative humidity below 50% — also reduces the moisture load pushing into the attic from below.
What does professional repair and remediation actually involve?
Professional remediation is not just mould removal. Cleaning the sheathing without fixing the source is a temporary measure that typically fails within one or two wet seasons. BC Housing’s retrofit guidance is direct on this point: remediation that only removes mould without repairing the assembly is rarely durable.
A proper professional scope follows this sequence:
Step 1: Confirm and quantify. The contractor uses moisture meters and thermal imaging to map the full extent of damage before touching anything. This baseline is what you compare against after repairs to confirm success.
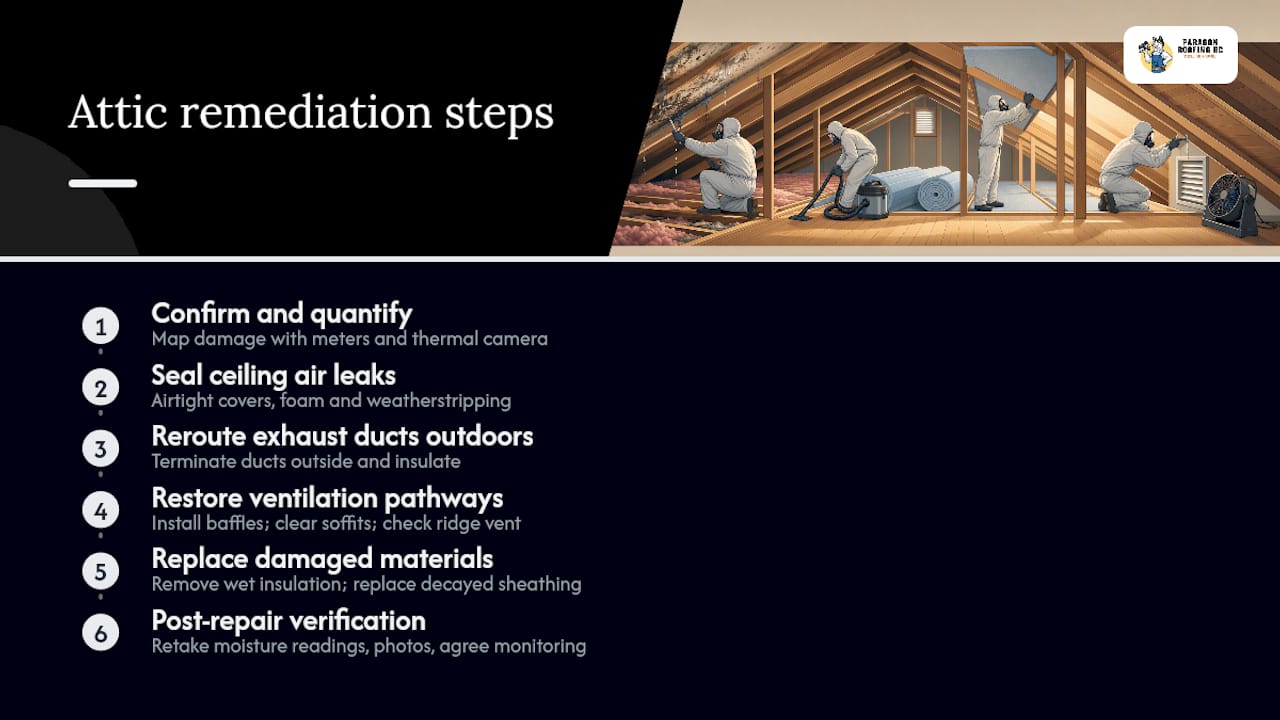
Step 2: Seal air leaks at the ceiling plane. Pot lights get airtight covers or are replaced with IC-rated sealed fixtures. Plumbing stack penetrations and attic hatch frames get foam and weatherstripping. This is the highest-impact intervention in most Burnaby homes.
Step 3: Reroute exhaust ducts outdoors. Every bathroom fan, kitchen exhaust, and dryer duct gets confirmed to terminate through the roof or wall to the exterior. Disconnected or in-attic-terminating ducts get rerouted and insulated to prevent condensation inside the duct itself.
Step 4: Restore ventilation pathways. Baffles are installed or repositioned to maintain a clear channel from soffit to ridge. Blocked soffit vents are cleared or replaced. Ridge venting is confirmed to be unobstructed.
Step 5: Replace damaged material when needed. Wet insulation is removed and replaced after the assembly has dried to acceptable moisture levels. Sheathing with moisture content that has driven visible decay or structural softening gets cut out and replaced. RDH’s monitoring work supports documenting before-and-after moisture readings so remediation success can be verified rather than assumed.
Step 6: Post-repair verification. Moisture meter readings are retaken across the repaired areas. Photos document the completed work. A maintenance plan and seasonal monitoring schedule are discussed with the homeowner.
For attic insulation and ventilation questions specific to Lower Mainland assemblies, the technical tradeoffs between insulation depth and drying capacity are worth understanding before any repair scope is finalised.
Seasonal checklist to prevent condensation coming back
Prevention is mostly about maintenance discipline and catching small problems before they compound over a wet season.
| Task | Frequency | Notes |
|---|---|---|
| Visual attic inspection (hatch check) | Annually, each spring | Look for winter condensation signs: staining, mould, wet insulation |
| Soffit vent clearing | Each autumn | Clear leaves, debris, and any insulation that has shifted to block vents |
| Exhaust duct termination check | Each autumn | Confirm bathroom fans and dryer ducts exit outdoors; check for bird nests or blockages |
| Moisture meter readings at key points | Annually, late autumn | Baseline readings before the wet season; compare year over year |
| Baffle and insulation inspection | Every 2–3 years | Confirm baffles are in place and insulation hasn’t compressed or shifted |
| Attic hatch weatherstripping | Every 2–3 years | Replace worn seals that allow warm air to bypass the ceiling plane |
For property managers overseeing strata townhouses or multi-unit buildings, include attic inspections in the annual maintenance programme and log moisture meter readings with photographs each time. North Vancouver multi-unit moisture and mould causes follow the same patterns as Burnaby single-family homes, but the shared-wall construction and stacked exhaust systems in townhouses create additional pathways for moisture to migrate between units. Documenting a measurement baseline before and after each wet season is what separates a managed building from one that surprises you with a remediation bill.
A seasonal roofing checklist for Burnaby homeowners covers the broader roof maintenance tasks that pair with attic monitoring, including gutter clearing, valley inspection, and flashing checks.
What does local building science say about attic wetting in cool marine climates?
The research picture for coastal BC is more nuanced than the standard “add more vents” advice suggests.
RDH’s Lower Mainland monitoring found plywood sheathing moisture contents of approximately 20–30% during winter months, with mould growth appearing within the first year on underside sheathing in ventilated test huts. Ventilation alone did not prevent the problem.
ORNL field and modelling work reinforces this finding: in cool marine climates, outdoor air carries enough moisture that increased ventilation can actually raise sheathing moisture content in well-insulated attics. The outdoor air that enters through soffit vents is not always dry enough to carry moisture away. Night-sky radiation cooling drops sheathing temperatures below the dew point of that incoming air, and condensation forms on the sheathing surface regardless of how many vents are present.
HIABC investigations in the region consistently show that the visual indicators — pepper-like speckling, fuzzy growth, rusted nail heads — are most concentrated on north elevations, confirming that solar drying is a meaningful part of the moisture balance equation. North-facing slopes in Burnaby can go through an entire wet season without enough direct sun to dry accumulated moisture.
BC Housing’s retrofit guidance adds an important caution for re-roofing projects: replacing older high-thermal-mass roof systems with modern low-mass membranes can increase condensation risk unless exterior insulation or other design changes compensate. The thermal mass of the old assembly was doing moisture-buffering work that the new assembly no longer provides.
Field investigations from HIABC also show that ventilation sometimes increases moisture pickup on sheathing in well-insulated attics in marine climates — a counterintuitive finding that underscores why assembly-specific advice matters more than generic ventilation rules.
Research-driven priorities for Burnaby homeowners:
- Air seal the ceiling plane before adding or modifying ventilation
- Confirm every exhaust duct terminates outdoors before the wet season
- When re-roofing, discuss thermal mass and condensation risk with your contractor
- Use moisture meter readings as an annual monitoring tool, not just a diagnostic one
Understanding why roof ventilation matters in Burnaby’s wet climate is the foundation for making sense of these research findings in practical terms.
When should you stop monitoring and call a professional?
Some attic moisture situations are genuinely monitor-and-wait. Others need a professional on-site within days. Here’s how to tell the difference.
Call a professional immediately if you see:
- Active dripping or water on the ceiling below the attic
- Widespread mould covering structural framing members (not just sheathing surface)
- Sheathing that feels soft or sags visibly between rafters
- Saturated insulation across multiple bays
- Moisture meter readings above 20% in more than one location on the same visit
What to expect from a professional inspection: a thorough attic inspection for condensation damage typically takes one to two hours for a standard residential attic. The inspector should provide written documentation of moisture meter readings at multiple points, thermal imaging findings if an IR camera is used, exhaust duct termination locations, soffit vent and baffle condition, and a clear description of any mould or decay observed. You should receive before-and-after readings if remediation follows.
When selecting a contractor, look for someone with documented experience in Burnaby’s climate specifically. Ask whether they use a moisture meter and thermal imaging as standard tools, not optional add-ons. Ask for before-and-after moisture readings as part of the repair deliverables. A Burnaby roof inspection that includes attic moisture assessment gives you the diagnostic baseline you need to make repair decisions confidently.
A local inspector’s perspective on what actually matters
Hey, it’s Harman. After inspecting attics across Burnaby and the North Shore, the call that sticks with me most is the one where the homeowner was convinced they had a roof leak. The shingles were fine. The flashing was intact. But the north-facing bays were covered in fuzzy grey growth, and the nail heads near the soffits were rusted solid. The bathroom fan duct had pulled away from its roof cap fitting — probably years earlier — and had been dumping warm, humid air directly into the attic every time someone showered.
The fix wasn’t a new roof. It was a reconnected duct, some air sealing around the pot lights in the master bedroom ceiling, and new baffles to restore soffit airflow.
The lesson I keep coming back to: fix the air barrier first, then sort out the exhaust terminations, and only then decide whether ventilation changes are needed. In Burnaby’s climate, adding vents without sealing the interior air leaks first is like opening a window to dry out a wet sponge — the outdoor air in November isn’t going to help you.
The other thing homeowners underestimate is how much the north side of the attic tells you. If the south-facing bays look fine but the north-facing bays are speckled and damp, that’s not a random distribution. It’s the climate doing exactly what the research predicts. Solar drying is doing real work on the south side, and the north side is on its own.
Paragonroofingbc handles Burnaby attic moisture from inspection to repair
Attic condensation damage in Burnaby is one of the most misdiagnosed problems we see. Homeowners assume it’s a roof leak, call for shingle repairs, and the mould comes back the following winter because the air leakage and exhaust issues were never addressed.

Paragonroofingbc offers roof and attic inspections that include moisture meter readings, thermal imaging, exhaust duct termination checks, and a written report with before-and-after documentation. When repairs are needed, our scope covers air sealing at the ceiling plane, exhaust rerouting, baffle installation, insulation replacement, and sheathing repairs where decay has set in. For homes that need a full roof replacement, we factor condensation risk into the assembly design so the new roof doesn’t repeat the same problems.
If you’re seeing any of the signs described in this guide, the practical next step is a professional moisture assessment. Reach out to Paragonroofingbc through our local roofing contractor page to book an inspection and get a clear picture of what your attic is actually doing.
Sources
FAQ
What does water damage look like in an attic?
Attic water damage from condensation typically appears as dark pepper-like speckling or fuzzy mould colonies on the underside of sheathing, rusted nail heads, compacted or wet insulation, and soft or sagging sheathing panels. Staining that runs toward the eaves and a musty odour in upper-floor rooms are also common indicators.
Should I worry about condensation in my attic?
Yes, particularly in Burnaby’s cool marine climate. RDH monitoring recorded sheathing moisture contents of 20–30% during winter months in the Lower Mainland, with mould growth appearing within the first year even in ventilated attics. Left unaddressed, condensation leads to insulation saturation, sheathing decay, and shortened roof life.
What are the signs of poor attic ventilation?
Blocked or missing soffit vents, displaced baffles that allow insulation to cover the soffit intake, and exhaust ducts terminating inside the attic rather than outdoors are the most common ventilation failures. Visible mould concentrated near soffits and on north-facing bays is a reliable indicator that airflow through the attic is inadequate or that moisture sources are overwhelming whatever ventilation exists.
Can too much insulation cause attic condensation?
Excessive insulation depth can lower sheathing temperatures by reducing heat transfer from the conditioned space, making the sheathing surface colder and more prone to condensation. This risk increases when insulation is added without also improving the air barrier at the ceiling plane, since more insulation without better air sealing means cold sheathing and continued air leakage — a combination that drives condensation.
Recommended
Our Roofing Blog

Have more questions about roofing?
Check out our FAQs or give us a call today to speak to an expert roofer in Vancouver Lower Mainland, BC. We're here to help our neighbours make educated decisions about their roof. For our team, we value helping clients save money while making their roofs last.
