
Burnaby chimney cricket leaks: causes, fixes, and costs
Burnaby chimney cricket leaks: causes, fixes, and costs

If water is showing up near your chimney after a storm, the most likely culprit is a flashing failure or a missing (or undersized) chimney cricket on the uphill side of the chimney. Both problems are common on Burnaby roofs, and both need an on-roof inspection, not another tube of caulking.
Before you call anyone, protect the house. Here is what to do in the next hour or so:
- Contain any active drip with a bucket or towel and move furniture or storage away from the wet area.
- Skip the attic if water is actively coming through electrical fixtures nearby. Wait until it’s dry and safe.
- Photograph every stain, drip point, and the chimney itself from the ground, with today’s date and the weather noted.
- Book an on-roof inspection with a roofer who works with saw-cut reglet counterflashing and cricket installation, not just surface caulking.
Pro Tip: Take your photos in daylight, straight on and at an angle, so a roofer can spot flashing gaps or a missing cricket before they even climb the ladder.
Key Takeaways
Most Burnaby chimney leaks trace back to failed flashing or a missing cricket on chimneys 30 inches or wider, and both require an on-roof inspection to diagnose correctly.
| Point | Details |
|---|---|
| Diagnose before you patch | Confirm whether the cause is flashing failure or a missing cricket before spending money on re-caulking. |
| Code threshold for crickets | The IRC 2024 requires a cricket on chimneys 30 inches or wider measured across the slope. |
| Insist on reglet counterflashing | Saw-cut reglet counterflashing outlasts surface-mounted caulked flashing by years, not months. |
| Bundle with a reroof | Installing a cricket during a full reroof saves roughly 30% on labour versus a standalone retrofit. |
| Paragon Roofing BC’s approach | Offers on-roof inspection, photo documentation, clear reglet-versus-surface-mounted scope, and a written workmanship warranty for Burnaby homeowners. |
Table of Contents
- What causes chimney leaks in Burnaby homes
- Why Burnaby’s weather is hard on chimney flashing
- What is a chimney cricket and when do you need one?
- Chimney flashing components and where they fail
- How roofers diagnose a chimney leak
- Permanent fixes for chimney flashing and cricket problems
- What does chimney flashing repair cost in Burnaby?
- Seasonal maintenance that prevents chimney leaks
- Hiring a roofer for chimney cricket and flashing work
- Get your chimney inspected before the next storm
- Sources
- FAQ
What causes chimney leaks in Burnaby homes
A leaking chimney almost always traces back to one of two problems: the flashing around the chimney base has failed, or the chimney is wide enough that it needs a cricket and never got one. Chimney leak repair in Burnaby usually starts with figuring out which of the two you’re dealing with, since the fix is different for each.
Flashing failure shows up outside as rust streaks running down the brick, gaps where mortar has pulled away from the metal, or a shiny bead of caulk that’s cracked and lifted at the edges. Inside, you’ll see staining on the attic sheathing closest to the chimney, insulation that stays damp longer than the surrounding areas, water marks in the firebox, or ceiling stains that trace back toward the chimney chase. Some homeowners find the leak even lower, with water tracking down the chimney chase and showing up as dampness or a musty smell in the basement.
Before your roofer arrives, walk through this checklist:
- Check the attic for staining, wet wood, or compressed insulation near the chimney, using a flashlight and stepping only on joists.
- Look inside the firebox and around the fireplace surround for water lines or efflorescence (the white chalky mineral deposit left behind as water evaporates).
- Photograph the roof from the ground on all four sides of the chimney, especially the uphill face.
- Note when the leak happens: during heavy rain, only with wind from a certain direction, or during the spring thaw.
Pro Tip: A leak that only appears during wind-driven rain, but never during a calm downpour, usually points to a flashing gap rather than a cricket problem. Wind pushes water sideways under lapped metal that would otherwise shed it fine.
Why Burnaby’s weather is hard on chimney flashing
Burnaby sits in one of the wetter parts of Metro Vancouver, and that rainfall doesn’t fall straight down most of the year. Wind-driven rain off the inlet pushes water sideways into laps and seams that were only ever designed to shed water moving downhill, and that’s exactly the kind of moisture that finds a weak reglet joint or a gap behind counterflashing. Add in freeze-thaw cycles through January and February, and any water that’s already worked its way behind the flashing expands as ice, prying the seam open a little wider each cycle.
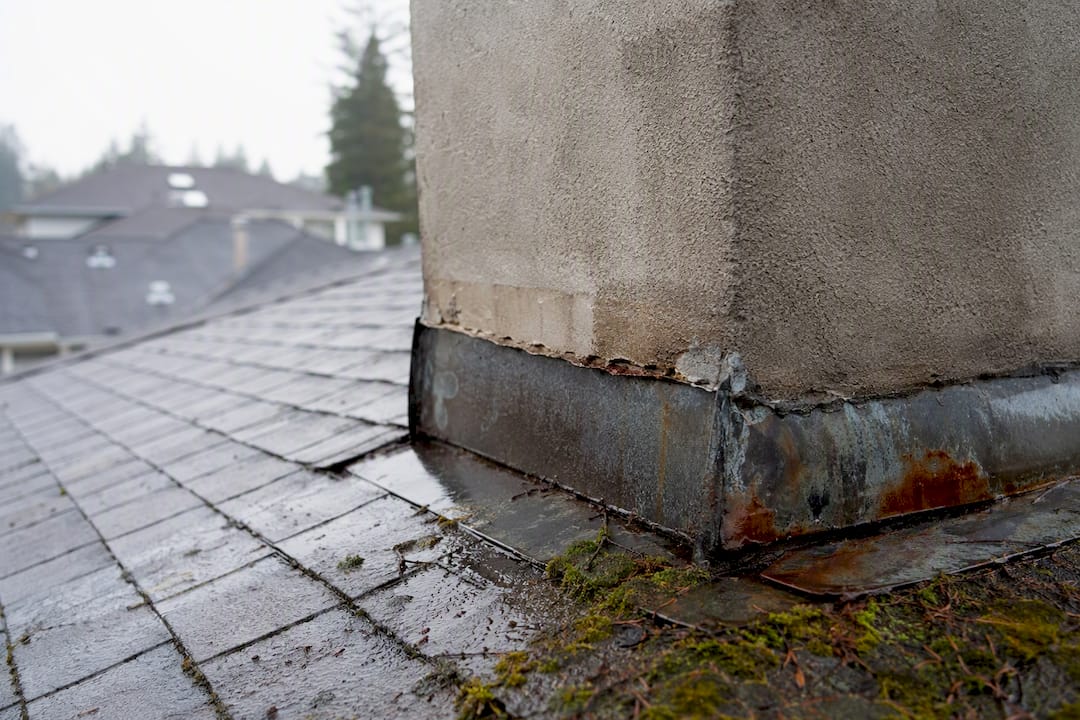
Moss and organic debris pile up in that upslope pocket behind a chimney faster than most homeowners realize, holding moisture against the flashing year-round and accelerating corrosion on galvanized steel in particular. A lot of Burnaby’s housing stock dates from the 1960s through the 1980s, when many chimneys were flashed with materials and methods that don’t hold up to 60 years of coastal weather. That’s exactly why a cricket-plus-reflash retrofit is one of the more common repairs we get called out for on older Burnaby homes.
What is a chimney cricket and when do you need one?
A chimney cricket, sometimes called a saddle, is a small triangular ridge built into the roof on the uphill side of the chimney, with details on common structural challenges explored in Common roof structure solar challenges for UK homeowners – Smart Home Technical Ltd. It splits rainwater and meltwater around the chimney instead of letting it pool against the upslope face, which is exactly where most chimney water damage solutions start.
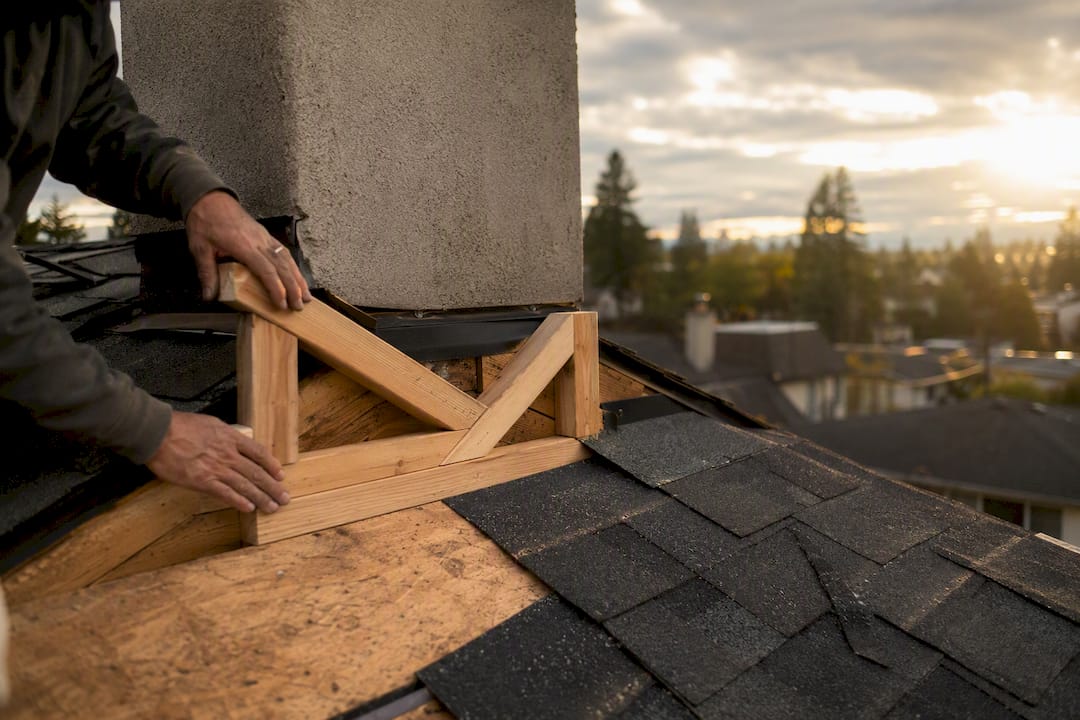
The IRC 2024 building code requires a cricket whenever the chimney’s uphill face measures 30 inches (762 mm) or wider, measured perpendicular to the roof slope. That’s the legal minimum, but in Burnaby’s climate we routinely recommend one on narrower chimneys too, since wind-driven rain doesn’t care much about code thresholds.
Sizing and pitch matter more than most homeowners expect:
- The cricket’s slope should match or exceed the main roof’s pitch, so water actually keeps moving instead of pooling.
- On low-slope roofs, the cricket slope is often built even steeper than the surrounding roof to avoid ponding, and it’s usually finished with rigid insulation and membrane rather than shingles.
- Picture two roof planes meeting at a short ridge just uphill of the chimney, angled to shed water toward both sides. That silhouette is the cricket.
Pro Tip: Insist on continuous self-adhered ice-and-water shield wrapped under the entire cricket frame, and counterflashing embedded in a saw-cut reglet rather than caulked to the brick surface. Skip either one and you’re just delaying the next leak.
Chimney flashing components and where they fail
Chimney flashing isn’t one piece of metal, it’s a system, and knowing the parts helps you follow along when a roofer explains the scope.
- Apron flashing covers the downhill (front) side of the chimney where it meets the roof.
- Step flashing runs up both sides, one L-shaped piece tucked under each shingle course.
- Counterflashing overlaps the step flashing and tucks into the masonry to keep water from running behind it.
- Reglet is the cut groove in the mortar joint where counterflashing gets embedded and sealed.
- Pan and cap flashing cover the back (uphill) side, often built into or paired with the cricket.
Most recurring leaks we see in Burnaby trace back to a handful of repeat offenders: counterflashing that was surface-mounted and caulked to the brick instead of saw-cut into a reglet, step flashing that’s missing entirely or was installed as one long strip instead of individual pieces per course, corroded galvanized metal that’s been rusting quietly for years, and a chimney that’s settled slightly, cracking the seal between masonry and metal.
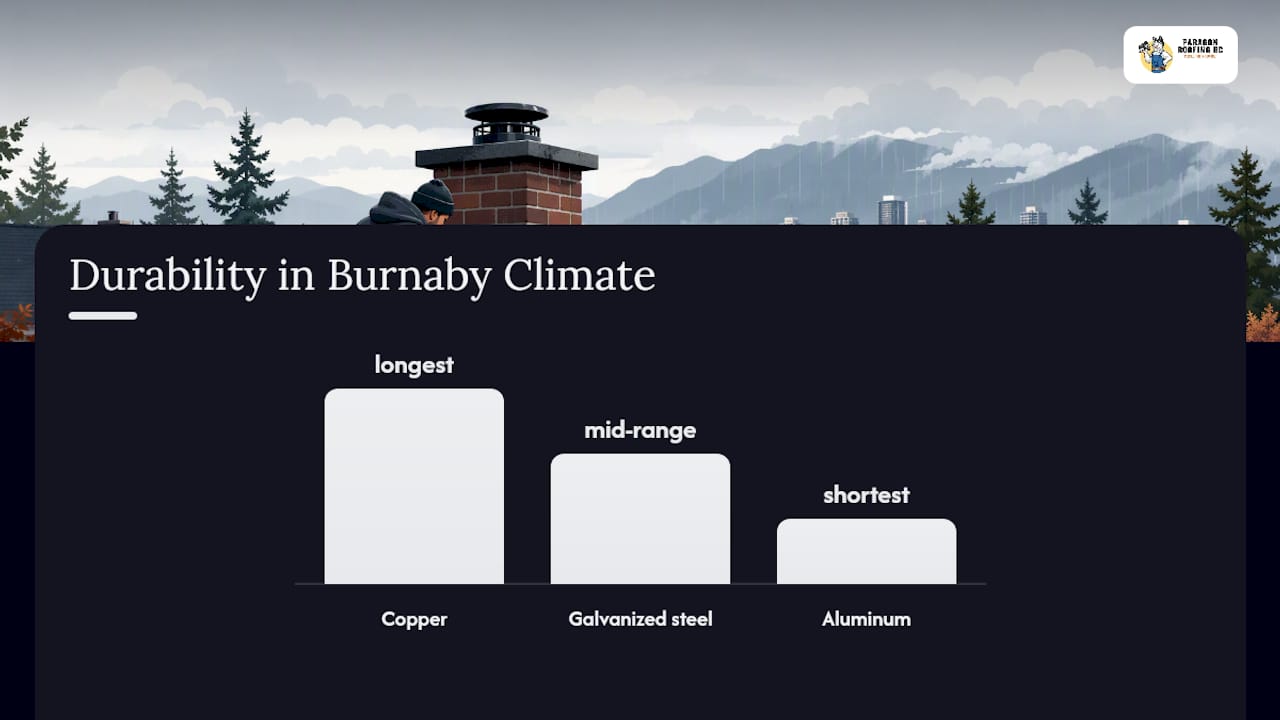
On materials, copper holds up the longest in Burnaby’s coastal air and rarely needs replacing within a homeowner’s lifetime. Galvanized steel is a reasonable mid-range option but corrodes faster once the coating is scratched or worn thin. Aluminum is the least durable of the three in our climate and tends to pit and fail sooner than either alternative.
Here’s the part that trips up a lot of well-meaning repairs: re-caulking a leaking counterflashing joint might buy you a dry season or two, but if the real problem is a wide chimney with no cricket, water is still pooling in that uphill pocket every time it rains. The caulk just delays the next call.
How roofers diagnose a chimney leak
A proper diagnosis follows a sequence, and it’s worth knowing the steps so you can ask informed questions when the roofer is on-site.
- Exterior roof walk to inspect the chimney crown, mortar joints, flashing condition, and measure the chimney’s uphill width relative to the roof slope.
- Attic inspection to trace staining patterns back toward their actual entry point, which isn’t always directly above the interior stain.
- Controlled water test , when the source isn’t obvious, where a hose is run section by section starting low and working up while someone watches inside.
- Chimney crown and mortar check for hairline cracks or spalling that let water into the masonry itself, separate from the flashing issue.
Before the roofer shows up, have this ready: a rough timeline of when leaks occur, your attic and interior photos, and easy roof access if there’s a locked gate or ladder concern.
Ask these questions during the visit:
- Is the chimney wide enough to require a cricket under code, or does it need one anyway given our weather?
- Is the current counterflashing surface-mounted or set into a reglet?
- Is the flashing failure isolated, or is there evidence of a broken seal at multiple points?
If the roofer finds a chimney face pushing past that 30-inch threshold with no cricket in sight, that’s your answer on why the leak keeps coming back no matter how many times it’s been patched.
Permanent fixes for chimney flashing and cricket problems
A lasting repair follows a specific build sequence, and it’s worth knowing the order so you can tell a thorough scope from a quick patch job.
- Remove shingles in a perimeter around the chimney to expose the decking.
- Inspect and repair decking and underlayment where water has caused rot or delamination.
- Frame the cricket if the chimney requires one, sized to match or exceed the main roof pitch.
- Wrap the entire cricket and surrounding deck in continuous self-adhered ice-and-water shield, no gaps or seams left exposed.
- Install new step flashing, one piece per shingle course, up both sides of the chimney.
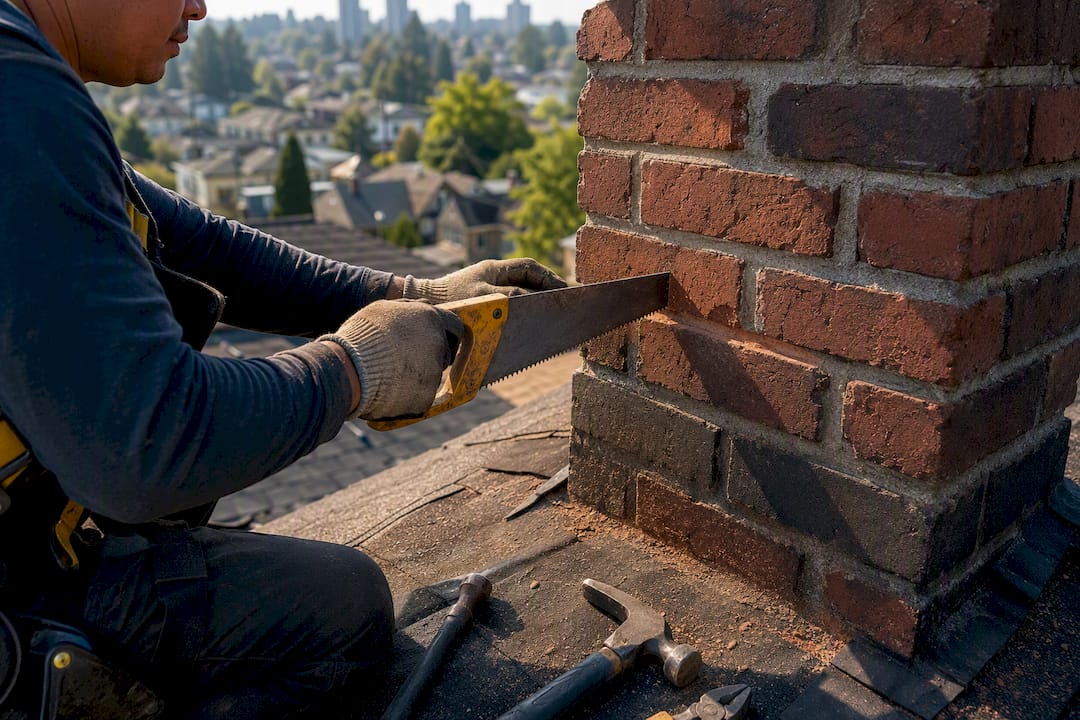
- Cut a reglet into the mortar joint and set counterflashing into it, sealed properly rather than surface-caulked.
- Finish with new shingles or metal ridge cap around the repair, and address any chimney crown cracks or repointing needed on the masonry itself.
A few specs are worth holding your contractor to: continuous ice-and-water membrane under the cricket with no interruptions, step flashing on every course rather than one long strip, adequate reglet depth for the counterflashing to seat properly, and corrosion-resistant metal that suits your climate exposure. Fine Homebuilding’s build guide walks through these details for anyone who wants the full technical picture.
Ask for before-and-after photos of the reglet cut, the cricket framing before it’s covered, and the finished flashing. Any contractor doing this correctly will have these photos already, since it’s part of documenting workmanship.
Whether you need a repair or a full rebuild depends on what’s underneath the flashing. Minor mortar cracking and a sound crown usually mean a repair and reflash gets the job done. Significant masonry deterioration, a cracked or spalling crown, or structural leaning of the chimney itself usually means a full rebuild is the more sensible long-term call.
Pro Tip: A saw-cut reglet costs more upfront than caulking counterflashing to the surface, but it’s the difference between a repair that lasts fifteen years and one that leaks again in fifteen months. Ask which method is in the quote before you sign anything.
What does chimney flashing repair cost in Burnaby?
Costs vary a fair bit depending on scope, but here’s what homeowners typically budget for in the Burnaby area:
- A small cricket added during a full reroof: on the lower end of the cost range, since the roof is already stripped and the crew has full access.
- A standalone cricket retrofit outside of a reroof: runs higher because it requires separate tear-off, staging, and shingle matching around the repair.
- A full reflash job with saw-cut reglet counterflashing: mid-range, depending on chimney size and flashing material chosen.
- Crown repair or repointing: added separately if the masonry itself needs attention, priced by the extent of damage.
Industry estimates put labour savings at roughly 30% when a cricket is installed alongside a full reroof, since the crew avoids a second tear-off and setup around the chimney.
Timelines follow a similar pattern: the inspection itself takes an afternoon, a straightforward reflash or small cricket runs one to two days, a cricket paired with minor roofing work runs two to four days, and anything involving a chimney rebuild or major masonry work can stretch into multiple weeks depending on mason availability.
Every estimate should still start with an on-site visit. Hidden rot in the decking or unexpected masonry damage under the old flashing changes the scope, and a real quote reflects what’s actually under there, not a guess from the ground.
Seasonal maintenance that prevents chimney leaks
A little upkeep goes a long way toward keeping flashing and crickets doing their job for the long haul.
- Clear leaves, needles, and moss out of the uphill chimney pocket every fall before the rainy season really sets in.
- Walk the roof (or have someone do it) after any major windstorm to check flashing hasn’t lifted or shifted.
- Check the attic for new staining each spring, right after the freeze-thaw cycle has had its chance to work on any weak seams.
- Treat sealant touch-ups as a stopgap only. If you’re re-caulking the same joint every year or two, that’s a sign the real fix is a cricket or reglet, not more caulk.
For strata properties and rental buildings, an annual roof inspection paired with gutter cleaning and moss removal catches most flashing problems before they become interior damage. It’s cheap insurance against a much more expensive drywall and insulation repair down the line.
Hiring a roofer for chimney cricket and flashing work
The questions you ask upfront tell you a lot about the quality of work you’re about to get. Ask directly: will the counterflashing be saw-cut into a reglet, or surface-mounted and caulked? Will the cricket, if one’s needed, get a continuous ice-and-water shield underneath it? Is step flashing going in one piece per course? Will you get before-and-after photos? Is there a written workmanship warranty, and what’s covered?
Red flags to walk away from:
- A quote that only mentions “re-caulking” the flashing with no discussion of the cricket or reglet.
- Surface-mounted counterflashing offered as the standard fix, with no reglet option even discussed.
- Reluctance to provide photos of the work in progress or the finished flashing.
- No local references or completed jobs in Burnaby or the surrounding Lower Mainland.
Ask for an itemized quote with materials listed by name (not just “flashing” or “waterproofing”), a written warranty term, and a clear scope that separates flashing work from any masonry repair. Paragon Roofing BC’s chimney repair and installation service is built around exactly this kind of documentation: on-roof inspection, photo record, and a scope that spells out reglet versus surface-mounted before any work starts.
Why bundling cricket work with a reroof pays off
The math on this one is straightforward. When a crew is already tearing off shingles and has the decking exposed for a full roof replacement, framing a cricket and running new ice-and-water shield takes a fraction of the labour it would on a standalone job, which lines up with that roughly 30% savings figure from industry cost estimates.
The other non-negotiable, according to trade-standard flashing guidance, is continuous ice-and-water shield under the cricket paired with saw-cut reglet counterflashing. Skip either step and you’re not fixing the leak, you’re postponing it.
A recent Burnaby chimney repair, and what it taught us
A homeowner near Burnaby’s Metrotown area had patched the same chimney leak three summers in a row with fresh caulk, and it kept coming back every time the wind blew rain in from the southwest. The chimney measured well over the 30-inch threshold with no cricket in sight, just years of surface-mounted counterflashing slowly failing. Once we framed a proper cricket, wrapped it in ice-and-water shield, and cut a reglet for the counterflashing, that leak was gone for good. We document every job like that one with full photo records and a written warranty, because homeowners deserve to see exactly what’s behind their new flashing.
Get your chimney inspected before the next storm
There are other ways to chase a chimney leak, patch kits from the hardware store, a handyman with a caulk gun, waiting to see if it dries up on its own, but none of them address a chimney that’s too wide for its flashing or missing a cricket altogether. Paragon Roofing BC handles this differently: a proper on-roof inspection that traces the leak to its actual source, whether that’s a flashing gap, a missing cricket, or masonry damage, before any repair scope gets written.

Every Burnaby inspection includes a full on-roof assessment, an attic check for hidden staining, photo documentation of what we find, and a written scope with an itemized estimate, no guessing games about what’s actually wrong. If the job calls for a cricket, saw-cut reglet counterflashing, or masonry repair, that gets spelled out clearly, along with a written workmanship warranty on the finished work. If your chimney’s due for attention, or you’re already planning a reroof and want the cricket work bundled in, book a Burnaby inspection and get a same-day photo report on what your chimney actually needs.
Sources
FAQ
Is it normal for chimneys to leak during heavy rain?
Chimneys shouldn’t leak during heavy rain if the flashing and cricket are built correctly. A leak during heavy or wind-driven rain almost always points to a flashing gap or a chimney that’s too wide for its cricket, or missing one entirely.
What could be causing a leak around my chimney in the attic?
Attic leaks near a chimney usually come from failed step flashing, corroded counterflashing, or a missing cricket letting water pool against the uphill masonry face. Staining that appears only during storms with wind from one direction often points specifically to a flashing seam rather than a crown crack.
Can a chimney leak water into my basement?
Yes. Water that gets behind chimney flashing can track down inside the chimney chase and show up as dampness, staining, or a musty smell in the basement, especially in homes where the chase runs from roof to foundation.
How can I fix leaks around my chimney?
The lasting fix depends on the cause: install a properly sized cricket if the chimney is wide enough to need one, and replace surface-mounted counterflashing with saw-cut reglet counterflashing. Paragon Roofing BC starts every job with an on-roof inspection to confirm which repair actually applies before writing a scope.
Recommended
Our Roofing Blog



Have more questions about roofing?
Check out our FAQs or give us a call today to speak to an expert roofer in Vancouver Lower Mainland, BC. We're here to help our neighbours make educated decisions about their roof. For our team, we value helping clients save money while making their roofs last.
